Инструкция для Sony DCR-PC10E
 1
1 2
2 3
3 4
4 5
5 6
6 7
7 8
8 9
9 10
10 11
11 12
12 13
13 14
14 15
15 16
16 17
17 18
18 19
19 20
20 21
21 22
22 23
23 24
24 25
25 26
26 27
27 28
28 29
29 30
30 31
31 32
32 33
33 34
34 35
35 36
36 37
37 38
38 39
39 40
40 41
41 42
42 43
43 44
44 45
45 46
46 47
47 48
48 49
49 50
50 51
51 52
52 53
53 54
54 55
55 56
56 57
57 58
58 59
59 60
60 61
61 62
62 63
63 64
64 65
65 66
66 67
67 68
68 69
69 70
70 71
71 72
72 73
73 74
74 75
75 76
76 77
77 78
78 79
79 80
80 81
81 82
82 83
83 84
84 85
85 86
86 87
87 88
88 89
89 90
90 91
91 92
92 93
93 94
94 95
95 96
96 97
97 98
98 99
99 100
100 101
101 102
102 103
103 104
104 105
105 106
106 107
107 108
108 109
109 110
110 111
111 112
112 113
113 114
114 115
115 116
116 117
117 118
118 119
119 120
120 121
121 122
122 123
123 124
124
3-860-749-52 (1)
©1997 by Sony Corporation
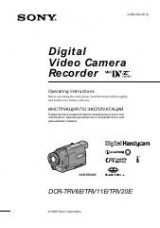
DCR-PC10E
Digital Video
Camera Recorder
Operating Instructions
Before operating the unit, please read this manual thoroughly,
and retain it for future reference.
ИНСТРУКЦИЯ ПО ЭКСПЛУАТАЦИИ
Перед эксплуатацией аппарата внимательно прочтите,
пожалуйста, данное руководство и сохраняйте его для
дальнейших справок.
Оглавление инструкции
- Страница 1 из 125
3-860-749-52 (1) Digital Video Camera Recorder Operating Instructions Before operating the unit, please read this manual thoroughly, and retain it for future reference. ИНСТРУКЦИЯ ПО ЭКСПЛУАТАЦИИ Перед эксплуатацией аппарата внимательно прочтите, пожалуйста, данное руководство и сохраняйте его для
- Страница 2 из 125
English Русский Welcome! Congratulations on your purchase of this Sony Handycam Vision camcorder. With your Handycam Vision you can capture life’s precious moments with superior picture and sound quality. Your Handycam Vision is loaded with advanced features, but at the same time it is very easy
- Страница 3 из 125
English Table of contents Before you begin Using this manual ................................................... 5 Checking supplied accessories ............................. 7 Basic operations Camera recording ................................................. 13 Using the zoom feature
- Страница 4 из 125
Русский Оглавление Перед началом эксплуатации Использование данного руководства ................. 5 Проверка прилагаемых принадлежностей ........ 7 Подготовка к эксплуатации Зарядка и установка батарейного блока ........... 8 Вставка кассеты ................................................. 12
- Страница 5 из 125
Before you begin Using this manual Note on TV colour systems TV colour systems differ from country to country. To view your recordings on a TV, you need a PAL system-based TV. Note on cassette memory This camcorder is based on the DV format. You can only use mini DV cassettes with this camcorder.
- Страница 6 из 125
Using this manual Precautions on camcorder care •The LCD screen and/or the colour viewfinder are manufactured using high-precision technology. However, there may be some tiny black points and/or bright points (red, blue or green in colour) that constantly appear on the LCD screen and/or in the
- Страница 7 из 125
Checking supplied accessories Check that the following accessories are supplied with your camcorder. Проверка прилагаемых принадлежностей Проверьте, что следующие принадлежности прилагаются к Вашей видеокамере. 2 3 4 5 6 7 8 1 Wireless Remote Commander (1) (p. 117) 2 NP-F100 battery pack (1) (p. 8)
- Страница 8 из 125
Getting started Подготовка к эксплуатации Charging and installing the battery pack Зарядка и установка батарейного блока Before using your camcorder, you first need to charge and install the battery pack. To charge the battery pack, use the supplied AC power adaptor. This camcorder operates with
- Страница 9 из 125
Charging and installing the battery pack Charging time Зарядка и установка батарейного блока Время зарядки Battery pack Charging time * Батарейный блок Время зарядки* NP-F100 (supplied) 130 (70) NP-F100 (прилагается) 130 (70) NP-F200 170 (110) NP-F200 170 (110) NP-F300 250 (190) NP-F300 250 (190)
- Страница 10 из 125
Charging and installing the battery pack Note on remaining battery time indication during recording Remaining battery time is displayed on the LCD screen or in the viewfinder. However, the indication may not be displayed properly, depending on using conditions and circumstances. Зарядка и установка
- Страница 11 из 125
Charging and installing the battery pack Зарядка и установка батарейного блока Installing the battery pack Установка батарейного блока 1 (1) Сдвигая переключатель BATT RELEASE в направлении стрелки, снимите крышку батарейных контактов. (2) Зацепите крючки батарейного блока за захваты видеокамеры и
- Страница 12 из 125
Inserting a cassette Вставка кассеты You can use mini DV cassette with logo* only. Make sure that the power source is installed. (1) While sliding 6 OPEN/EJECT in the direction of the arrow 1, open the lid in the direction of the arrow 2. The cassette compartment automatically lifts up and opens.
- Страница 13 из 125
Basic operations Основные операции Camera recording 2 VTR POWER OFF STBY –:– –:– – 60min PHOTO CAMERA 3 Убедитесь, что источник питания установлен,кассета вставлена и переключатель START/STOP MODE установлен в положение . Если Вы используете видеокамеру в первый раз, то включите ее и установите
- Страница 14 из 125
Camera recording Запись с помощью видеокамеры To stop recording momentarily [a] Для временной остановки записи [a] Press START/STOP. The “STBY” indicator appears in the viewfinder (Standby mode). Нажмите START/STOP. Индикатор “STBY” появляется в видоискателе (режим готовности). To finish recording
- Страница 15 из 125
Camera recording Notes on the time code and editing •The time code indicates the recording or playback time, "0:00:00" (hours : minutes : seconds) in CAMERA mode and "0:00:00:00" (hours : minutes : seconds : frames) in VTR mode. •Do not make a blank portion during recording. If there is a blank
- Страница 16 из 125
Camera recording Запись с помощью видеокамеры Note on the beep sound As indicated with in the illustrations, a beep sounds when you turn the power on or when you start recording, and two beeps sound when you stop recording, confirming the operation. Several beeps also sound as a warning of any
- Страница 17 из 125
Camera recording Запись с помощью видеокамеры When you shoot a subject using a telephoto zoom If you cannot get a sharp focus while in extreme telephoto zoom, press the “W” side of the power zoom switch until the focus is sharp. You can shoot a subject that is at least about 80 cm away from the
- Страница 18 из 125
Camera recording Запись с помощью видеокамеры Selecting the start/stop mode Выбор режима запуска/останова Your camcorder has two modes besides normal start/stop mode. These modes enable you to take a series of quick shots resulting in a lively video. (1) Set START/STOP MODE to the desired mode.
- Страница 19 из 125
Camera recording Запись с помощью видеокамеры Для продления времени записи в режиме 5SEC Press START/STOP again before all the dots disappear. Recording continues for about 5 seconds from the moment you press START/ STOP. Нажмите START/STOP снова до того, как все точки исчезнут. Запись продолжается
- Страница 20 из 125
Camera recording Notes on the LCD panel •When closing the LCD panel, turn it vertically until it clicks [a]. •When turning the LCD panel, turn it always vertically; otherwise, the camcorder body may be damaged or the LCD panel may not close properly [b]. •Close the LCD panel completely when not in
- Страница 21 из 125
Camera recording Примечания к зеркальному режиму • Когда Вы поворачиваете панель ЖКД на 180 градусов, видеокамера входит в зеркальный режим. • Используя зеркальный режим, Вы можете записать самого себя, наблюдая себя на на экране ЖКД. • Изображение на экране ЖКД появляется в зеркальном отображении
- Страница 22 из 125
Hints for better shooting Советы для лучшей съемки For hand-held shots, you will get better results by holding the camcorder according to the following suggestions: •Hold the camcorder firmly and secure it with the grip strap so that you can easily manipulate the controls with your thumb. [a] Для
- Страница 23 из 125
Hints for better shooting If you wear glasses You can bend back the eyecup to get a better view of viewfinder [d]. Cautions on the LCD panel and the viewfinder •Do not pick up the camcorder by the viewfinder or the LCD panel [e]. •Do not place the camcorder so as to point the viewfinder or the LCD
- Страница 24 из 125
Checking the recorded picture Проверка записанного изображения Используя EDIT SEARCH, Вы можете пересмотреть последнюю записанную сцену или проверить записанное изображение на экране ЖКД. (1) Нажимая OPEN, откройте панель ЖКД. (2) Нажимая маленькую зеленую кнопку на выключателе POWER, установите
- Страница 25 из 125
Воспроизведение ленты Playing back a tape 1 Вы можете просматривать изображение на экране ЖКД или в видоискателе. (1) Вставьте записанную ленту с окошком, обращенным наружу. (2) Нажимая OPEN, откройте панель ЖКД. Отрегулируйте угол панели ЖКД. (3) Нажимая маленькую зеленую кнопку на выключателе
- Страница 26 из 125
Playing back a tape To display the LCD screen indicators Press DISPLAY. To erase the indicators, press again. Notes on screen indicators •The screen indicators in the viewfinder are always displayed. •The screen indicator disappears when the title is displayed. •When you play back a tape using a
- Страница 27 из 125
Playing back a tape To monitor the high-speed picture while advancing the tape or rewinding (skip scan) Keep pressing 0 while rewinding or ) while advancing the tape. To resume normal rewinding or fast-forward, release the button. Воспроизведение ленты Для контроля изображения на высокой скорости
- Страница 28 из 125
Playing back a tape Notes on playback •The sound is muted in the various playback modes. •During playback other than normal playback, the previous recording may appear in mosaic image. This is not malfunction. •When playback pause mode lasts for 5 minutes, the camcorder automatically enters stop
- Страница 29 из 125
Searching for the end of the picture You can go to the end of the recorded portion after you record and play back the tape. The tape starts rewinding or fast-forwarding and the last about 5 seconds of the recorded portion plays back. Then the tape stops at the end of the recorded picture (End
- Страница 30 из 125
Advanced operations Using alternative power sources You can choose any of the following power sources for your camcorder: battery pack, mains, and 12/24 V car battery. Choose the appropriate power source depending on where you want to use your camcorder. Place Power Accessory to be used source
- Страница 31 из 125
Using alternative power sources Charging the battery pack You can charge the battery pack installed in the camcorder by connecting the AC power adaptor to the camcorder and setting the POWER switch to OFF. Charging time of the supplied NP-F100 battery pack is as follows: Full charge: approx. 2
- Страница 32 из 125
Using alternative power sources WARNING The mains lead must only be changed at a qualified service shop. PRECAUTION The set is not disconnected from the AC power source (mains) as long as it is connected to the mains, even if the set itself has been turned off. Using a car battery Use a car battery
- Страница 33 из 125
Changing the mode settings 2 MENU Вы можете изменять установки режимов в системе меню для большего наслаждения особенностями и функциями видеокамеры. (1) Нажимая OPEN, откройте панель ЖКД. (2) Нажмите MENU для отображения меню на экране ЖКД. (3) Поверните регулировочный диск для выбора желаемой
- Страница 34 из 125
Changing the mode settings Изменение установок режимов Note on mirror mode While recording in mirror mode, the menu does not appear on the LCD screen or in the viewfinder. Примечание к зеркальному режиму Во время записи в зеркальном режиме меню не будет появляться на экране ЖКД или в видоискателе.
- Страница 35 из 125
Changing the mode settings Items for CAMERA/PHOTO mode only PROGRAM AE* Select this item to use the PROGRAM AE function. See page 47 for details. P EFFECT** Select this item to enjoy the picture effect. See page 43 for details. D ZOOM <ON/OFF> •Select ON to activate digital zooming. •Select OFF not
- Страница 36 из 125
Changing the mode settings REC LAMP <ON/OFF> •Normally select ON. •Select OFF when you do not want the camera recording/battery lamp at the front of the unit to light up. When recording a close subject When REC LAMP is set to ON, the red camera recording lamp on the front of the camcorder may
- Страница 37 из 125
Changing the mode settings Изменение установок режимов Items for VTR mode only Установки только для режима VTR TITLE DSPL <ON/OFF> •Select ON to display the title you have chosen. •Select OFF not to display the title. TITLE DSPL <ON/OFF> • Выберите ON ддля отображения выбранного Вами титра. •
- Страница 38 из 125
Fade-in and fade-out You can fade in or out to give your recording a professional appearance. When fading in, the picture gradually fades in from black while the sound increases. When fading out, the picture gradually fades to black while the sound decreases. When fading in [a] (1) While the
- Страница 39 из 125
Fade-in and fade-out Введение и выведение изображения To cancel the fade-in/fade-out function Для отмены функции введения/ выведения изображения Before pressing START/STOP, press FADER until the fade indicator disappears. Перед нажатием START/STOP нажимайте FADER до тех пор, пока индикатор введения
- Страница 40 из 125
Photo recording You can record a still picture like a photograph for about seven seconds. This mode is useful when you want to enjoy a picture such as a photograph or when you print a picture using a video printer (not supplied). You can record about 510 pictures in SP mode on a 60-minute tape.
- Страница 41 из 125
Photo recording Note on using the Remote Commander If you press the PHOTO button on the Remote Commander when a picture appears on the LCD screen or in the viewfinder, the camcorder will record that picture immediately. You cannot change the picture by using this button. Note on the still picture
- Страница 42 из 125
Photo recording Запись фотографий Printing the still picture Распечатка неподвижного изображения You can print a still picture by using the video printer (not supplied). Connect the video printer using the supplied A/V connecting cable. Connect it to the AUDIO VIDEO OUT/ 2 jack and connect the
- Страница 43 из 125
Enjoying picture effect Наслаждение эффектами изображений Selecting picture effect Выбор эффекта изображения You can make pictures like those of television with the Picture Effect function. [a] [b] С помощью функции эффектов изображения Вы можете сделать изображение похожим на те, что передают по
- Страница 44 из 125
Наслаждение эффектами изображений Enjoying picture effect Using picture effect function (1) While pressing OPEN, open the LCD panel. (2) Press MENU to display the menu on the LCD screen. (3) Turn the control dial to select P EFFECT, then press the control dial. (4) Turn the control dial to select
- Страница 45 из 125
Using the wide mode function You can record a 16:9 wide picture to watch on the 16:9 wide-screen TV (16:9 WIDE). The picture with black bands at the top and the bottom on the LCD screen or in the viewfinder [a] is normal. The picture on a normal TV [b] is horizontally compressed. You can watch the
- Страница 46 из 125
Using the wide mode function To cancel wide mode Select OFF in step 4, then press the control dial. To watch the tape recorded in wide mode To watch the tape recorded in wide mode, set it to full mode. For details, refer to the instruction manual of your TV. Note that the picture recorded in wide
- Страница 47 из 125
Using the PROGRAM AE function Использование функции PROGRAM AE You can select from six PROGRAM AE (Auto Exposure) modes to suit your shooting situation. When you use PROGRAM AE, you can get a Portrait effect (the subject is in focus and the background is out of focus), capture high-speed action,
- Страница 48 из 125
Using the PROGRAM AE function Использование функции PROGRAM AE Using the PROGRAM AE function Использование функции PROGRAM AE (1) While pressing OPEN, open the LCD panel. (2) Press MENU to display the menu on the LCD screen. (3) Turn the control dial to select PROGRAM AE, then press the control
- Страница 49 из 125
Releasing the STEADYSHOT function Отключение функции STEADYSHOT Когда вы производите съемку, индикатор появляется на экране ЖКД или в видоискателе. Это указывает на то, что функция устойчивой съемки работает для компенсации дрожания видеокамеры. When you shoot, the indicator appears on the LCD
- Страница 50 из 125
Releasing the STEADYSHOT function To activate the SteadyShot function again Для активизации функции устойчивой съемки снова Select ON in step 4, then press the control dial. Выберите ON в пункте 4, а затем нажмите регулировочный диск. Notes on the SteadyShot function •The SteadyShot function will
- Страница 51 из 125
Focusing manually Ручная фокусировка When to use manual focus Когда использовать ручную фокусировку In the following cases you should obtain better results by adjusting the focus manually. [a] [b] [c] [d] • Недостаточное освещение [a] • Объекты с малым контрастом — стены, небо и т.д. [b] • Слишком
- Страница 52 из 125
Focusing manually Ручная фокусировка Focusing manually Ручная фокусировка When focusing manually, first focus in telephoto before recording, and then reset the shot length. (1) Press FOCUS lightly. The f indicator appears on the LCD screen or in the viewfinder. (2) Turn the focus ring to focus on
- Страница 53 из 125
Adjusting the exposure Регулировка экспозиции When to adjust the exposure Когда требуется регулировать экспозицию Adjust the exposure manually under the following cases. [a] [b] •Bright subject and dark background •To record the darkness faithfully [b] [a] Фон является слишком ярким (задняя
- Страница 54 из 125
Adjusting the white balance White balance adjustment makes white subjects look white and allows more natural colour balance for camera recording. Normally white balance is automatically adjusted. You can obtain better results by adjusting the white balance manually when lighting conditions change
- Страница 55 из 125
Adjusting the white balance Регулировка баланса белого Setting the white balance Установка баланса белого 2,5 (1) Нажимая OPEN, откройте панель ЖКД. (2) Нажмите MENU для отображения меню на экране ЖКД во время режима записи или готовности. (3) Поверните регулировочный диск для выбора WHT BAL, а
- Страница 56 из 125
Watching on a TV screen Просмотр на экране телевизора Connect the camcorder to your VCR or TV to watch the playback picture on the TV screen. When monitoring the playback picture by connecting the camcorder to your TV, we recommend you to use mains for the power source. Connecting directly to a
- Страница 57 из 125
Watching on a TV screen If your VCR or TV is a monaural type Connect the yellow plug of the A/V connecting cable to the video input jack and the white or the red plug to the audio input jack on the VCR or the TV. When the white plug is connected, the left channel audio is output, and the red plug
- Страница 58 из 125
Watching on a TV screen If you use a Sony TV •You can turn on the TV automatically when you press LASER LINK or ·. To do so, set AUTO TV ON to ON in the menu system and turn the TV’s main switch on, then do either of the following; – Point the LASER LINK emitter towards the TV’s remote sensor and
- Страница 59 из 125
Searching for the boundaries of recorded date Поиск границ записанных дат Searching for the date by using cassette memory Поиск даты с использованием кассеты с памятью 3-5 2 Вы можете использовать данную функуию только при воспроизведении ленты кассеты с памятью. (1) Нажимая OPEN, откройте панель
- Страница 60 из 125
Searching for the boundaries of recorded date 60 Поиск границ записанных дат To stop searching Для остановки поиска Press p. Нажмите p. Notes •The interval of the boundaries between the dates needs more than two minutes. The camcorder may not search if the beginning of the recorded date is too
- Страница 61 из 125
Поиск границ записанных дат Searching for the date without using cassette memory Поиск даты без использования кассетной памяти You can use this function whether the tape has cassette memory or not. (1) Set CM SEARCH to OFF in step 5 of “Searching for the date by using cassette memory.” When using a
- Страница 62 из 125
Searching for the scene with title Поиск фрагмента с титром You can search for the scene with title – Title search function. If you use a tape with cassette memory, you can select the title displayed on the LCD screen or in the viewfinder. Вы можете найти фрагмент с титром – функция поиска титра.
- Страница 63 из 125
Searching for the scene with title Поиск фрагмента с титром Для остановки поиска Press p. Нажмите p. Notes •You cannot superimpose or search a title, if you use a cassette tape without cassette memory. •To superimpose a title, see page 75. •The camcorder may not search, if there is a blank portion
- Страница 64 из 125
Searching for a photo - photo search/photo scan Поиск фотографий – фотопоиск/ фотосканирование Searching for a photo by using cassette memory Поиск фотографий с использованием кассеты с памятью You can use this function only when playing back a tape with cassette memory. (1) While pressing OPEN,
- Страница 65 из 125
Searching for a photo - photo search/photo scan Поиск фотографий – фотопоиск/ фотосканирование Searching for a photo without using cassette memory Поиск фотографий без использования кассетной памти 1 Вы можете использовать данную функцию независимо от того, имеет ли кассета память или нет. (1)
- Страница 66 из 125
Searching for a photo - photo search/photo scan Поиск фотографий – фотопоиск/ фотосканирование Scanning photo Сканирование фотографий You can use this function whether the tape has cassette memory or not. (1) Set the POWER switch to VTR. (2) Press SEARCH MODE on the Remote Commander repeatedly
- Страница 67 из 125
Returning to a preregistered position 1 ( 0 : 12 : 3 4 : 0 0 40m i n ( 0 :00:00 40m i n ZERO SET MEMORY 2 Используя пульт дистанционного управления Вы можете легко вернуться к желаемой точке ленты после воспроизведения. (1) Во время воспроизведения нажмите ZERO SET MEMORY в месте, которое Вы хотите
- Страница 68 из 125
Displaying recording data – data code function You can display recording data (date/time or various settings when recorded) on the LCD screen or in the viewfinder during playback Data Code function. The Data Code is also displayed on the TV. Press DATA CODE on the Remote Commander during playback.
- Страница 69 из 125
Editing onto another tape You can create your own video programme by editing with any other DV, mini DV, h 8 mm, H Hi8, j VHS, k S-VHS, VHSC, K S-VHSC or l Betamax VCR that has audio/video inputs. You can edit with little deterioration of picture and sound quality when using the DV connecting
- Страница 70 из 125
Editing onto another tape Монтаж на другую ленту Notes on editing when using the DV connecting cable •You can connect one VCR only. •You can record picture, sound and system data at the same time on the DV products by using the DV connecting cable only. •You cannot edit the titles, display
- Страница 71 из 125
Editing onto another tape Starting editing Turn down the volume of the camcorder while editing. Otherwise, picture distortion may occur. (1) Insert a blank tape (or a tape you want to record over) into the VCR, and insert your recorded tape into the camcorder. (2) Play back the recorded tape on the
- Страница 72 из 125
Replacing recording on a tape – insert editing Замещение записи на ленте - монтаж в режиме вставки You can insert a new scene from a VCR onto your originally recorded tape by specifying starting and ending points. Connection is the same as in “Using the DV connecting cable” on page 69. In recording
- Страница 73 из 125
Audio dubbing You can record an audio sound to add to the original sound on a tape by connecting audio equipment or a microphone. If you use the VMC-LM7 adaptor (not supplied) to connect the audio equipment, you can add a sound on your recorded tape by specifying starting and ending points. The
- Страница 74 из 125
Audio dubbing Наложение звукового сопровождения Adding an audio sound on a recorded tape Добавление звукового сопровождения на записанную ленту (1) Insert your recorded tape into the camcorder. (2) While pressing the small green button on the POWER switch, set it to VTR. (3) On the camcorder, press
- Страница 75 из 125
Superimposing a title If you use a tape with cassette memory, you can superimpose the titles while recording or after recording. When you playback the tape, the title is displayed for 5 seconds from the point where you superimposed it. You can select from eight preset titles and one original
- Страница 76 из 125
Superimposing a title Наложение титра While in Standby mode В режиме готовнсоти After step 7, the “TITLE” indicator appears. And when you press START/STOP to start recording, “SAVE” appears on the screen for 5 seconds and the title is set. После пункта 7 появляется индикатор “TITLE”. И когда Вы
- Страница 77 из 125
Superimposing a title Notes on the cassettes •If you use a cassette tape set to prevent accidental erasure, you cannot superimpose or erase the title. Slide the protect tab so that the red portion is not visible. •About 15 to 26 titles are possible in one cassette, if one title consists of about 5
- Страница 78 из 125
Superimposing a title Наложение титра Erasing a title Стирание титра (1) While pressing OPEN, open the LCD panel. (2) Press MENU to display the menu on the LCD screen. (3) Turn the control dial to select TITLEERASE, then press the control dial. (4) Turn the control dial to select the title you want
- Страница 79 из 125
Making a custom title Создание собственного титра Если Вы используете ленту кассеты с памятью, Вы можете создать один титр, содержащий до 20 знаков, и сохранить его в памяти. (1) Нажимая OPEN, откройте панель ЖКД. (2) Нажмите TITLE для отображения титров на экране ЖКД. (3) Поверните регулировочный
- Страница 80 из 125
Making a custom title Создание собственного титра To erase a character Для стирания знака In step 4, turn the control dial to select [M] then press the control dial. The last character is erased. В пункте 4 поверните регулировочный диск для выбора [M], а затем нажмите регулировочный диск. Последний
- Страница 81 из 125
Labeling a cassette To erase a character In step 7 turn the control dial to select [M], then press control dial. The last character is erased. To change the label you have made Insert the cassette to change the label, and operate in the same way to make a new label. If the mark appears in step 5
- Страница 82 из 125
Additional information Usable cassettes and playback modes Используемые кассеты и режимы воспроизведения Selecting cassette types Выбор типов кассет You can use the cassette only. You cannot use any other DV, h 8 mm, H Hi8, j VHS, k S-VHS, VHSC, K S-VHSC or l Betamax cassette. Вы можете
- Страница 83 из 125
Usable cassettes and playback modes 16-bit mode: A new sound cannot be recorded but the original sound can be recorded in high quality. Moreover, it can also play back sound recorded in 32 kHz, 44.1 kHz or 48 kHz. When playing back a tape recorded in the 16-bit mode, 16BIT indicator appears on the
- Страница 84 из 125
84 Charging the vanadiumlithium battery in the camcorder Зарядка ванадиеволитиевой батарейки в видеокамере Your camcorder is supplied with a vanadiumlithium battery installed so as to retain the date and time, etc., regardless of the setting of the POWER switch. The vanadium-lithium battery is
- Страница 85 из 125
Resetting the date and time Установка даты и времени 2 Дата и время установлены на заводе. Установите время в соответствии с местным временем в Вашей стране. Если Вы не используете видеокамеру приблизительно в течение полугода, то установки даты и времени могут быть утеряны (появляются черточки)
- Страница 86 из 125
Resetting the date and time To correct the date and time setting Repeat steps 3 to 6. Установка даты и времени Для корректировки установки даты и времени Повторите пункты с 3 по 6. The year indicators changes as follows: 1997 1998 ... 2000 ... 2029 Note on the time indicator The internal clock of
- Страница 87 из 125
Tips for using the battery pack This section shows you how you can get the most out of your battery pack. Советы по использованию батарейного блока Данный раздел показывает, как Вы можете получить наибольшую отдачу от Вашего батарейного блока Preparing the battery pack Always carry additional
- Страница 88 из 125
Tips for using the battery pack When to replace the battery pack While you are using your camcorder, the remaining battery indicator on the LCD screen or in the viewfinder decreases gradually as battery power is used up. The remaining time in minutes also appears. When the remaining battery
- Страница 89 из 125
Tips for using the battery pack Советы по использованию батарейного блока Уход за батарейным блоком •Remove the battery pack from the camcorder after using it, and keep it in a cool place. When the battery pack is installed to the camcorder, a small amount of current flows to the camcorder even if
- Страница 90 из 125
Tips for using the battery pack How the battery consumption is displayed Как отображается расход заряда батарейного блока The power consumption of the camcorder changes depending on its use, such as how the autofocusing is working on or not. While checking the condition of the camcorder, the
- Страница 91 из 125
Советы по использованию батарейного блока Tips for using the battery pack Why the remaining battery indication does not match the continuous recording time in the operation manual 1) Full charge: Charging for about 1 hour after the charge lamp of the AC power adaptor goes off. 2) Normal charge:
- Страница 92 из 125
Tips for using the battery pack Советы по использованию батарейного блока Notes on the terminals Примечания к контактам If the terminals (metal parts on the back) are not clean, the battery charge duration will be shortened. When the terminals are not clean or when the battery pack has not been
- Страница 93 из 125
Maintenance information and precautions Информация по уходу за аппаратом и предосторожности Moisture condensation Конденсация влаги If the camcorder is brought directly from a cold place to a warm place, moisture may condense inside the camcorder, on the surface of the tape, or on the lens. In this
- Страница 94 из 125
Maintenance information and precautions Информация по уходу за аппаратом и предосторожности Video head cleaning Очистка видеоголовок To ensure normal recording and clear pictures, clean the video heads. The video heads may be dirty when: •mosaic-pattern noise appears on the playback picture
- Страница 95 из 125
Maintenance information and precautions •Keep the POWER switch set to OFF when not using the camcorder. •Do not wrap up the camcorder and operate it since heat may build up internally. •Keep the camcorder away from strong magnetic fields or mechanical vibration. •Do not push the LCD screen. •If the
- Страница 96 из 125
Maintenance information and precautions AC power adaptor Сетевой адаптер перем. тока Charging •Use only a lithium ion type battery pack. •Place the battery pack on a flat surface without vibration during charging. •The battery pack will get hot during charging. This is normal. Зарядка • Используйте
- Страница 97 из 125
Maintenance information and precautions Информация по уходу за аппаратом и предосторожности Примечания к сухим батарейкам To avoid possible damage from battery leakage or corrosion, observe the following. •Be sure to insert the batteries in the correct direction. •Dry batteries are not
- Страница 98 из 125
Using your camcorder abroad Each country or area has its own electric and TV colour systems. Before using your camcorder abroad, check the following points. Power sources You can use your camcorder in any country or area with the supplied AC power adaptor within 100 V to 240 V AC, 50/60 Hz.
- Страница 99 из 125
English Trouble check If you run into any problem using the camcorder, use the following table to troubleshoot the problem. Should the difficulty persist, disconnect the power source and contact your Sony dealer or local authorized Sony service facility. Camcorder Power Symptom Cause and/or
- Страница 100 из 125
Trouble check Operation Symptom Cause and/or corrective actions The tape does not move when a tape transport button is pressed. • The POWER switch is set to CAMERA or OFF. m Set it to VTR. (p. 25) • The tape has run out. m Rewind the tape or use a new one. (p. 25) No sound or only a low sound is
- Страница 101 из 125
Trouble check Operation Symptom Cause and/or corrective actions The title search function does not work. • The tape has no cassette memory. m Use a tape with cassette memory. (p. 62) • CM SEARCH is set to OFF in the menu system. m Set it to ON. (p. 37) • There is no title in the tape. m Superimpose
- Страница 102 из 125
Trouble check Others Symptom Cause and/or corrective actions While editing using the DV connecting cable, recording picture cannot be monitored. • Remove the DV connecting cable, and connect it again. The camcorder becomes warm. • If the power of the cammcorder is on for a long time, it becomes
- Страница 103 из 125
Trouble check When the CHARGE lamp flashes Check through the following chart. Remove the battery pack from the AC power adaptor. Then install the same battery pack again. When the CHARGE lamp does not flash again If the CHARGE lamp lights up and goes out after a while, there is no problem. * When
- Страница 104 из 125
English Self-diagnosis function The camcorder has a self-diagnosis display. This function displays the camcorder’s condition with five digits (a combination of a letter and figures) on the LCD screen or in the viewfinder. If this occurs, check the following code chart. The five-digit display
- Страница 105 из 125
Русский Проверка неисправностей Если у Вас возникла какая-либо проблема при использовании видеокамеры, воспользуйтесь следующей таблицей для отыскания и устранения проблемы. Если трудности все еще остаются, то отсоедините источник питания и обратитесь к Вашему дилеру Sony или на местное
- Страница 106 из 125
Проверка неисправностей Работа Признак Причина и/или действия по исправлению Не активизируется функция поиска конца. • Вы не выполняли новой записи после после повторной установки кассеты. • Лента без кассетной памяти была вытолкнута после выполнения записи. Лента не перемещается при нажатии кнопки
- Страница 107 из 125
Проверка неисправностей Работа Признак Причина и/или действия по исправлению • Лента не имеет кассетной памяти. m Используйте ленту с кассетной памятью. (стр. 81) • Память кассеты заполнена. m Сотрите некоторые титры. (стр. 78) • Лента установлена на предотвращение случайного стирания. m
- Страница 108 из 125
Проверка неисправностей Изображение Признак Причина и/или действия по исправлению Незнакомое изображение появляется на экаране ЖКД или в видоискателе. • Если истечет 10 минут после того, как Вы установите выключатель POWER в положение CAMERA без вставленной кассеты, видеокамера автоматически
- Страница 109 из 125
Проверка неисправностей Когда мигает лампочка CHARGE Проверьте по следующей схеме. Снимите батарейный блок с сетевого адаптера перем. тока. Затем установите тот же самый батарейный блок. Если лампочка CHARGE мигает опять Имеется проблема у сетевого адаптера перем. тока. Если лампочка CHARGE больше
- Страница 110 из 125
Русский Функция самодиагностики Видеокамера имеет дисплей самодиагностики. Данная функция отображает состояние видеокамеры с помощью пяти знаков (комбинация буквы и цифр) на экране ЖКД или в видоискателе. Если это случится, проверьте следующую кодовую таблицу. Пятизначный дисплей информирует Вас о
- Страница 111 из 125
English Specifications Video camera recorder System LCD screen Picture 2.5 inches measured diagonally 50.015 x 37.428 mm On-screen display TN LCD/TFT active matrix method Total dot number 180,000 (800 x 225) S video output 4-pin mini DIN Luminance signal: 1 Vp-p, 75 ohms, unbalanced, sync negative
- Страница 112 из 125
Русский Технические характеристики Видеокамера Система Система видеозаписи Две вращающиеся головки, система наклонной механической развертки Система аудиозаписи Вращающиеся головки, система РСМ Квантование: 12 битов (сдвиг по частоте 32 кГц, стереозвучание 1, стереозвучание 2) Видеосигнал Цветовой
- Страница 113 из 125
Identifying the parts Опознавание частей 8 1 9 2 !º !¡ 3 !™ !£ 5 !¢ 6 !∞ 7 1 Lens cap (p. 13) 1 Крышка объектива (стр. 13) 2 LCD screen (p. 19) 2 Экран ЖКД (стр. 19) 3 OPEN button (p. 19) 4 6 OPEN/EJECT switch (p. 12) 3 Кнопка OPEN (стр. 19) 4 Переключатель 6 OPEN/EJECT (стр. 12) 5 Battery terminal
- Страница 114 из 125
Identifying the parts Опознавание частей @™ @£ !§ !¶ @¢ !• @∞ !ª @º @¡ !§ Zoom switch (p. 16) !§ Переключатель трансфокатора (стр. 16) !¶ Viewfinder lens adjustment dial (p. 14) !¶ Регулировочный диск объектива видоискателя (стр. 14) !• START/STOP MODE swtich (p. 18) !ª Lock knob (p. 14) !•
- Страница 115 из 125
Identifying the parts Опознавание частей #£ @§ #¢ @¶ #∞ #§ @• @ª #• #¡ #™ @§ LCD BRIGHT buttons (p. 19, 25) @§ Кнопки LCD BRIGHT (стр. 19, 25) @¶ EDIT SEARCH buttons (p. 24) @¶ Кнопки EDIT SEARCH (стр. 24) @• Speaker @• Громкоговоритель @ª END SEARCH button (p. 24, 29) @ª Кнопка END SEARCH (стр.
- Страница 116 из 125
Identifying the parts Опознавание частей $¡ #ª $™ $£ $º $¢ $∞ #ª Cassette compartment (p. 12) #ª Кассетный отсек (стр. 12) $º RESET button (p. 102) $º Кнопка RESET (стр. 108) $¡ Lens $™ Recording lamp (p. 13) $£ LASER LINK transmitter (p. 57) $¡ Объектив $™ Лампочка записи (стр. 13) $£ Передатчик
- Страница 117 из 125
Identifying the parts Опознавание частей Remote Commander Пульт дистанционного управления The buttons that have the same name on the Remote Commander as on the camcorder function identically. Кнопки пульта дистанционного упрвления, которые имеют одинаковые наименования с кнопками на видеокамере,
- Страница 118 из 125
Identifying the Parts Опознавание частей To prepare the Remote Commander To use the Remote Commander, you must insert two R6 (size AA) batteries. Use the supplied R6 (size AA) batteries. (1) Remove the battery cover from the Remote Commander. (2) Insert both of the R6 (size AA) batteries with
- Страница 119 из 125
Identifying the parts Примечания к пульту дистанционного управления • Держите дистанционный датчик подальше от сильных источников света, как например, прямые солнечные лучи или иллюминация. В противном случае дистанционное управление может не действовать. • Убедитесь, что между дистанционным
- Страница 120 из 125
Identifying the parts Опознавание частей Operation indicators Рабочие индикаторы 1 !™ 2 !£ 3 !¢ 4 !∞ 5 6 7 W M FADER 16:9WIDE SOLARIZE T STBY 0:12:34 40min PHOTO ZERO SET MEMORY !§ !¶ !• 8 9 VOL !º DV IN 16BIT 50min !ª @º !¡ @¡ 1 Mirror mode indicator (p. 20) 1 Индикатор зеркального режима (стр.
- Страница 121 из 125
Identifying the parts Опознавание частей !£ Recording mode indicator (p. 14) !£ Индикатор режима записи (стр. 14) !¢ Tape transport mode indicator (p. 13) !¢ Индикатор режима перемещения ленты (стр. 13) !∞ Time code indicator (p. 15)/ Self-diagnosis indicator (p. 104) !∞ Индикатор временного кода
- Страница 122 из 125
Warning indicators If indicators flash or warning messages appear on the LCD screen or in the viewfinder, check the following: : you can hear the beep sound when BEEP is set to ON in the menu system. Предупреждающие индикаторы Если индикаторы мигают или предупреждающие сообщения появляются на
- Страница 123 из 125
Warning indicators Предупреждающие индикаторы 4 No tape has been inserted. 4 Лента не вставлена. 5 The tab on the tape is out (red). 5 На кассете нет лепестка (красная метка). 6 Moisture condensation has occurred. (p. 93) 6 Произошла конденсация влаги. (стр. 93) 7 The video heads may be
- Страница 124 из 125
Index A, B Audio dubbing ........................... 73 Audio mode ................................ 82 BATT RELEASE ......................... 11 BEEP ...................................... 16, 34 C Camera recording ...................... 13 Car battery .................................. 32 Cassette
- Страница 125 из 125