Инструкция для Sony VAD-WG
 1
1 2
2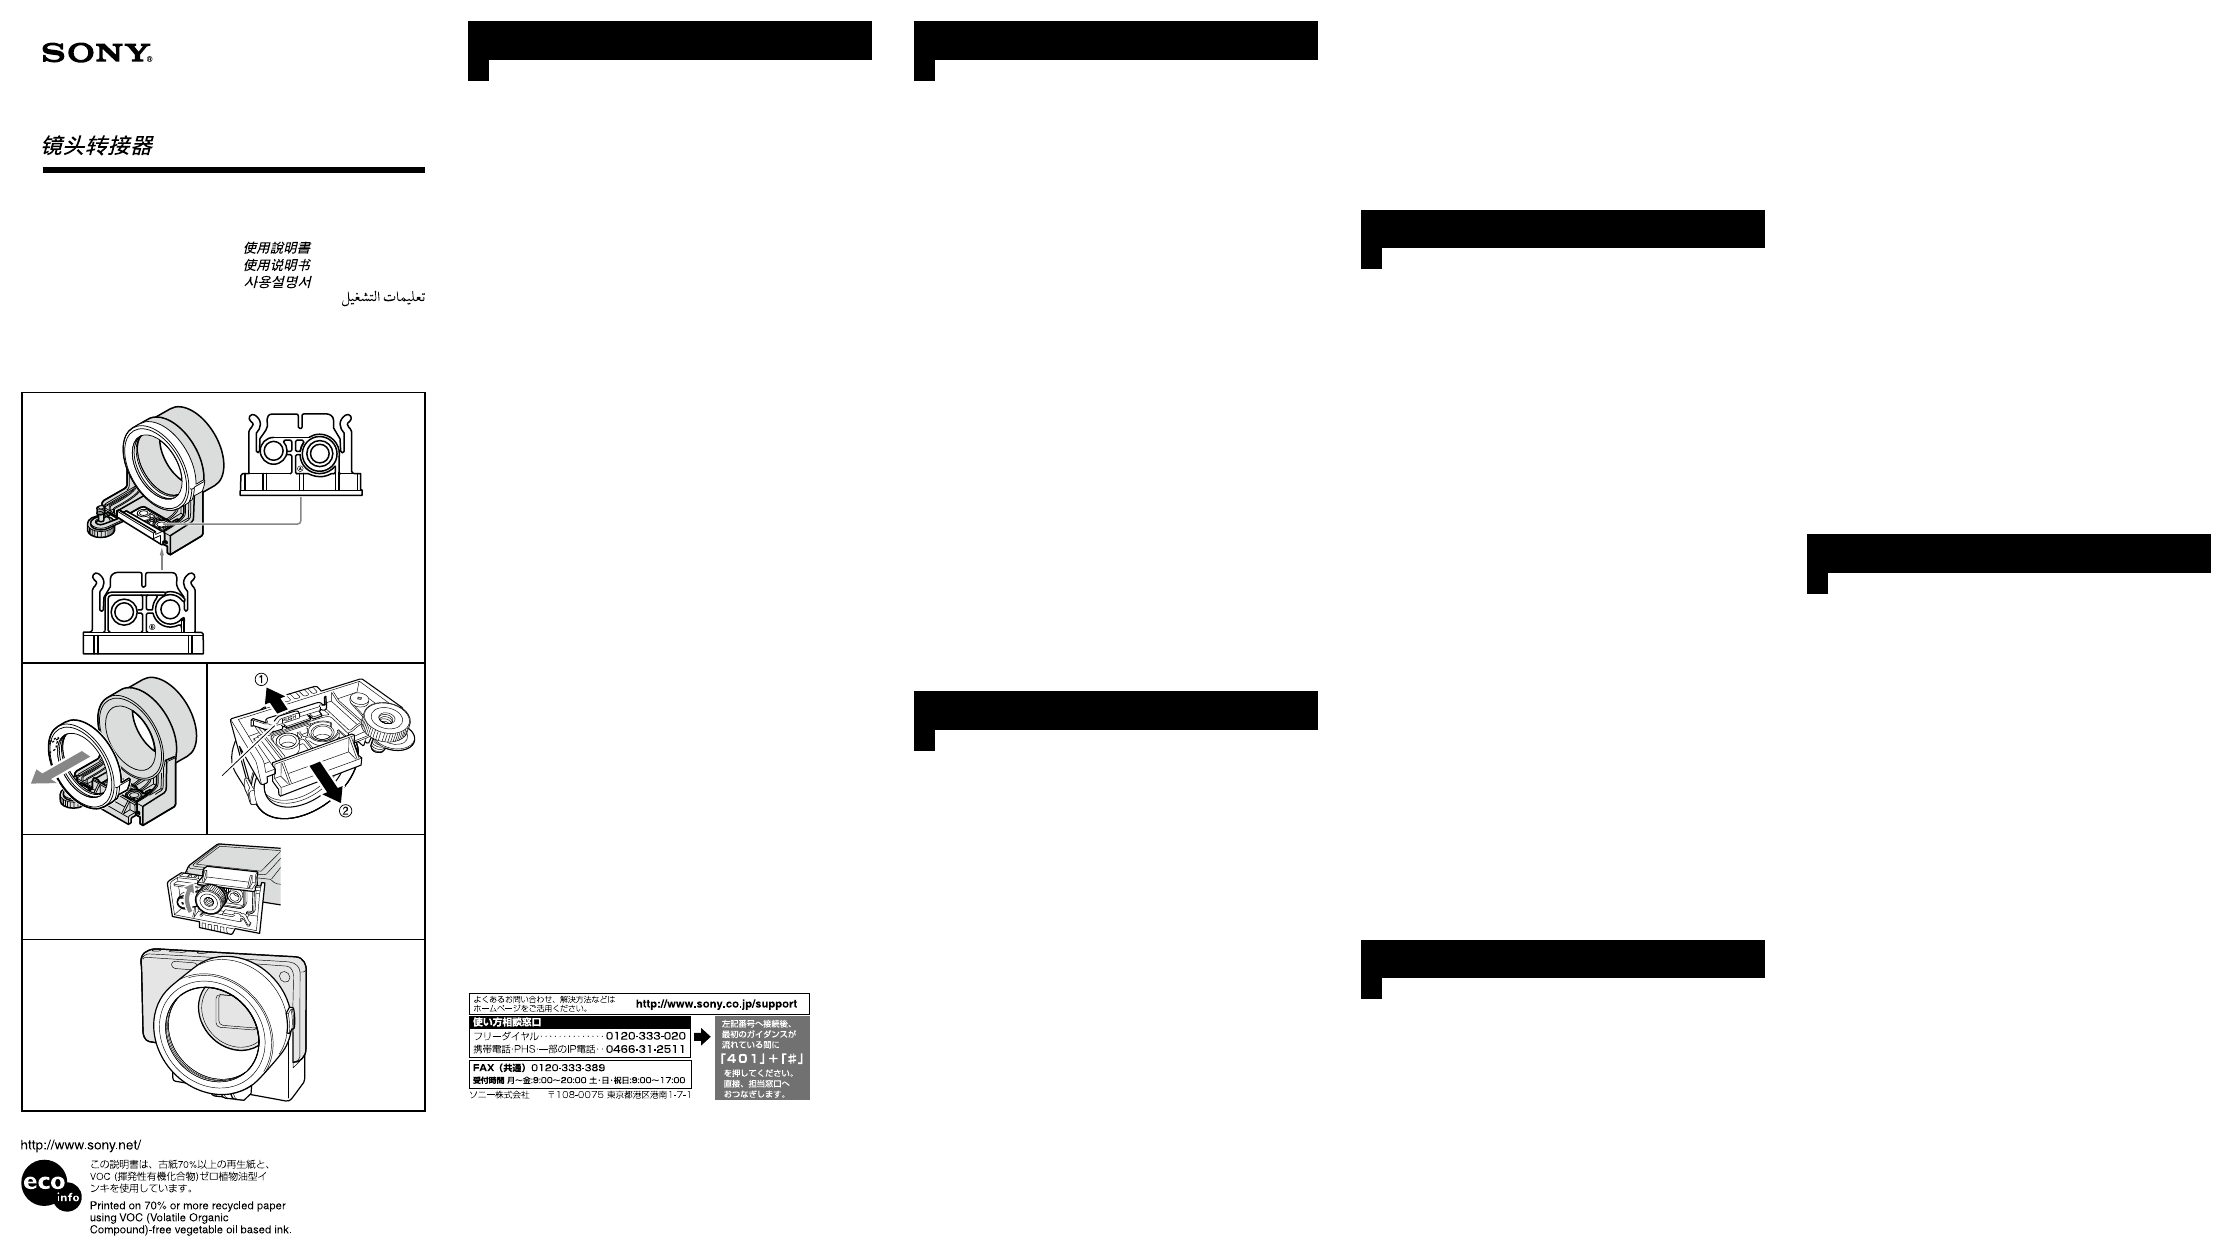
VAD-WG
46mm
*
A
B
(
-
)
a
(
-
)
1
2
3
4
1
2
AF
M46 0.75
65 73 55 mm
60
1
1
1
1
VAD-WG
/Lens Adaptor/
Adaptateur d objectif/
4-129-281-01 (1)
The VAD-WG is a lens adaptor for the Sony digital still camera. Read the instructions
carefully before use.
Using the lens adaptor
Use the lens adaptor when attaching a 46 mm diameter conversion lens to the digital still camera.
The digital still camera can be fitted to a tripod with the lens adaptor attached.
Deciding the mount side and use of the spacer
Selecting the side of the lens adaptor mount, and whether or not to use the spacer will
depend on your digital still camera.
Be sure to check the mount side and the necessity of the spacer (using the table of the
separate sheet) before attaching the mount.
When you purchase your lens adaptor, the mount is fitted enabling side A to be used. The
spacer is also attached.
When using the mount side B, remove the spacer attached to the reverse side of the lens
adaptor before use. (Illustration
-
)
How to detach the mount
Push
a
in the direction of
, and detach the mount in the direction of
. (Illustration
-
)
How to attach
1
Fit the mount to the lens adaptor with the selected mount side (A or B) facing up.
2
Turn off the power of the digital still camera.
3
Attach the lens adaptor to the digital still camera.
4
Tighten the fixing screw of the lens adaptor.
How to detach
1
Turn off the power of the digital still camera.
2
Loosen the fixing screw of the lens adaptor and remove it from the digital still camera.
Notes on use
Turn off the power of the digital still camera before attaching or removing the lens adaptor.
Do not attach a conversion lens to the lens adaptor when it is not mounted on the digital
still camera.
Reflected glare may occur depending on the shooting condition. If this happens, change
the condition.
Restrictions on use
AF illuminator cannot be used.
A built-in flash cannot be used.
Specifications
Screw thread for lens:
M46 × 0.75
Dimensions:
Approx. 65 × 73 × 55 mm (2 5/8 × 2 7/8 × 2 1/4 in.) (w/h/d)
Mass:
Approx. 60 g (2.2 oz.)
Included items:
Lens adaptor (1), Mount (1), Spacer (1), Carrying pouch (1),
Set of printed documentation
Design and specifications are subject to change without notice.
“Cyber-shot” is a trademark of Sony Corporation.
*
Operating Instructions
Mode d’emploi
Manual de instrucciones
Bedienungsanleitung
Gebruiksaanwijzing
Bruksanvisning
Istruzioni per l’uso
Manual de instruções
Инструкция по эксплуатации
©2009 Sony Corporation Printed in Japan
VAD-WG
Français
Le VAD-WG est un adaptateur d’objectif destiné à l’appareil photo numérique Sony. Lisez
attentivement le mode d’emploi avant utilisation.
Utilisation de l’adaptateur d’objectif
Utilisez l’adaptateur d’objectif lorsque vous fixez un convertisseur de 46 mm de diamètre sur
l’appareil photo numérique.
L’appareil photo numérique peut être fixé à un trépied lorsque l’adaptateur d’objectif est
rattaché.
Choix du côté de la monture et utilisation de l’entretoise
Sélectionnez le côté de la monture de l’adaptateur d’objectif et choisissez d’utiliser ou non
l’entretoise selon votre appareil photo numérique.
Avant d’installer la monture, vérifiez toujours le côté de la monture et si une entretoise doit
être ou non utilisée (voir le tableau sur la feuille volante).
Lorsque vous faites l’acquisition d’un adaptateur d’objectif, la monture est installée de
sorte que le côté A puisse être utilisé. L’entretoise est également fixée.
Si vous utilisez le côté B de la monture, enlevez l’entretoise fixée au côté opposé de
l’adaptateur d’objectif avant de l’utiliser. (Illustration
-
)
Comment détacher la monture
Poussez
a
dans le sens de
, et détachez la monture dans le sens de
. (Illustration
-
)
Mise en place
1
Fixez la monture à l’adaptateur d’objectif en orientant le côté approprié de la monture (A
ou B) vers le haut.
2
Mettez l’appareil photo numérique hors tension.
3
Fixez l’adaptateur d’objectif sur l’appareil photo numérique.
4
Serrez la vis de fixation de l’adaptateur d’objectif.
Retrait
1
Mettez l’appareil photo numérique hors tension.
2
Desserrez la vis de fixation de l’adaptateur d’objectif et détachez-la de l’appareil photo
numérique.
Remarques sur l’utilisation
Mettez l’appareil photo numérique hors tension avant de fixer ou de retirer l’adaptateur
d’objectif.
Ne fixez pas le convertisseur sur l’adaptateur d’objectif quand celui-ci n’est pas sur
l’appareil photo numérique.
Selon les conditions de prise de vue, un reflet peut apparaître. Dans ce cas, changez de
position.
*
Restrictions d’utilisation
Vous ne pouvez pas utiliser l’illuminateur AF.
Vous ne pouvez pas utiliser de flash intégré.
Spécifications
Filetage pour l’objectif:
M46 × 0,75
Dimensions:
Environ 65 × 73 × 55 mm (2 5/8 × 2 7/8 × 2 1/4 po.) (l/h/p)
Poids:
Environ 60 g (2,2 oz.)
Articles inclus:
Adaptateur d’objectif (1), Monture (1), Entretoise (1),
Étui de transport (1), Jeu de documents imprimés
La conception et les spécifications peuvent être modifiées sans préavis.
« Cyber-shot » est une marque commerciale de Sony Corporation.
Español
El VAD-WG es un adaptador de objetivo para cámaras fotográficas digitales Sony. Lea las
instrucciones detenidamente antes de utilizarlo.
Utilización del adaptador de objetivo
Utilice el adaptador de objetivo cuando coloque un objetivo de conversión de 46 mm en la
cámara fotográfica digital.
La cámara fotográfica digital puede fijarse a un trípode con el adaptador de objetivo
colocado.
Decisión del lado de la montura y de la utilización del espaciador
La selección del lado de de la montura del adaptador de objetivo, y de si se desea utilizar o
no el espaciador, dependerá de su cámara fotográfica digital.
Cerciórese de comprobar el lado de la montura y de la necesidad del espaciador (utilizando
la tabla de la hoja separada) antes de colocar la montura.
Al adquirir el adaptador de objetivo, la montura está fijada para permitir la utilización del
lado A. El espaciador también está fijado.
Para utilizar el lado B, retire el espaciador fijado en el lado contrario del adaptador de
objetivo antes usarlo. (Ilustración
-
)
Modo de extracción de la montura
Presione en “
a
” la dirección de
, y retire la montura en la dirección de
. (Ilustración
-
)
Modo de fijación
1
Fije la montura al adaptador de objetivo con el lado seleccionada de la misma (A o B)
encarado hacia arriba.
2
Desconecte la alimentación de la cámara fotográfica digital.
3
Fije el adaptador de objetivo a la cámara fotográfica digital.
4
Apriete el tornillo de fijación del adaptador de objetivo.
Modo de extracción
1
Desconecte la alimentación de la cámara fotográfica digital.
2
Afloje el tornillo de fijación del adaptador de objetivo y retire éste de la cámara
fotográfica digital.
Notas sobre la utilización
Antes de fijar o retirar el adaptador de objetivo, desconecte la alimentación de la cámara
fotográfica digital.
No fije un objetivo de conversión al adaptador de objetivo cuando éste no esté montado
en la cámara fotográfica digital.
Dependiendo de la condición de fotografiado, es posible que se produzcan reflejos.
Cuando suceda esto, cambie la condición.
Restricciones de utilización
No es posible utilizar el iluminador de enfoque automático (AF).
No es posible utilizar el flash incorporado.
Especificaciones
Rosca para objetivo:
M46 × 0,75
Dimensiones:
Aprox. 65 × 73 × 55 mm (an/al/prf)
Peso:
Aprox. 60 g
Elementos incluidos:
Adaptador para objetivo (1), Montura (1), Espaciador (1),
Funda de transporte (1), Juego de documentación impresa
El diseño y las especificaciones están sujetos a cambio sin previo aviso.
“Cyber-shot” es marca comercial de Sony Corporation.
*
Bei Verwendung der Seite B des Montageteils nehmen Sie das Abstandsstück an der
Rückseite des Objektivadapters vor der Verwendung ab. (Abbildung
-
)
Abnehmen des Montageteils
Drücken Sie
a
in Richtung
und nehmen das Montageteil in Richtung
ab (Abbildung
-
).
Anbringen von
1
Bringen Sie das Montageteil mit der ausgewählten Seite (A oder B) nach oben weisend
am Objektivadapter an.
2
Schalten Sie die digitale Standbildkamera aus.
3
Bringen Sie den Objektivadapter an der digitalen Standbildkamera an.
4
Ziehen Sie die Befestigungsschraube des Objektivadapters an.
Abnehmen
1
Schalten Sie die digitale Standbildkamera aus.
2
Lösen Sie die Befestigungsschraube des Objektivadapters und nehmen Sie diesen von der
digitalen Standbildkamera ab.
Hinweise zur Verwendung
Schalten Sie die digitale Standbildkamera aus, bevor Sie den Objektivadapter anbringen
bzw. abnehmen.
Bringen Sie keinen Konverter am Objektivadapter an, ohne dass dieser an der digitalen
Standbildkamera montiert ist.
Je nach Aufnahmesituation können Blendlichtreflexionen auftreten. In diesen Fall
ändern Sie die Aufnahmebedingungen.
Einschränkungen
Die AF-Hilfsbeleuchtung kann nicht verwendet werden.
Ein eingebauter Blitz kann nicht verwendet werden.
Technische Daten
Schraubengewinde für Objektiv:
M46 × 0,75
Abmessungen:
Ca. 65 × 73 × 55 mm (B/H/T)
Gewicht:
Ca. 60 g
Mitgeliefertes Zubehör:
Objektivadapter (1), Montageteil (1),
Abstandsstück (1), Tragetasche (1),
Anleitungen
Änderungen bei Design und technischen Daten bleiben ohne vorherige Ankündigung
vorbehalten.
„Cyber-shot“ ist ein Markenzeichen der Sony Corporation.
Nederlands
De VAD-WG is een lensadapter voor de Sony digitale fotocamera. Lees de
gebruiksaanwijzing voor gebruik aandachtig door.
De lensadapter gebruiken
Gebruik de lensadapter als u een 46 mm diameter conversielens bevestigt aan de digitale
fotocamera.
De digitale fotocamera kan op een statief worden geplaatst als de lensadapter is bevestigd.
De montagekant bepalen en het gebruik van het tussenstuk
Het selecteren van de kant waar de lensadapter wordt bevestigd en het wel of niet gebruiken
van het tussenstuk hangt af van uw digitale fotocamera.
Zorg ervoor dat u de montagekant en de noodzaak van het tussenstuk controleert (gebruik
de tabel van het apart bijgeleverde blad) voordat u de montage uitvoert.
Als u de lensadapter koopt is het aanzetstuk uitgerust voor bevestiging aan kant A. Het
tussenstuk is ook bevestigd.
Wanneer u montagekant B gebruikt, moet u het tussenstuk aan de andere kant van de
lensadapter voor gebruik verwijderen. (Afbeelding
-
)
Het aanzetstuk afnemen
Duw "
a
" in richting
, en verwijder het aanzetstuk in richting
. (Afbeelding
-
)
Hoe bevestigen
1
Plaats het aanzetstuk omhoog gericht aan de lensadapter bij de geselecteerde
montagekant (A of B).
2
Zet de digitale fotocamera aan.
3
Bevestig de lensadapter aan de digitale fotocamera.
4
Draai de vergrendelingschroef van de lensadapter vast.
Loskoppelen
1
Zet de digitale fotocamera aan.
2
Maak de vergrendelingschroef van de lensadapter los en haal deze van de digitale
fotocamera.
Opmerkingen bij gebruik
Zet de digitale fotocamera uit voordat u de lensadapter eraan bevestigt of loskoppelt.
Bevestig geen conversielens aan de lensadapter als deze niet aan de digitale fotocamera is
bevestigd.
Reflectieverblinding kan optreden afhankelijk van de opnameconditie. Als dit optreedt,
moet u de conditie wijzigen.
Beperkingen bij gebruik
AF-verlichting kan niet worden gebruikt.
Een ingebouwde flitser kan niet worden gebruikt.
Technische gegevens
Schroefdraad voor lens:
M46 × 0,75
Afmetingen:
Ongeveer 65 × 73 × 55 mm (b/h/d)
Gewicht:
Ongeveer 60 g
Bijgeleverde toebehoren:
Lensadapter (1), Aanzetstuk (1), Tussenstuk (1), Draagtas (1),
Handleiding en documentatie
Wijzigingen in ontwerp en technische gegevens voorbehouden, zonder kennisgeving.
"Cyber-shot" is een handelsmerk van Sony Corporation.
*
English
a
Der VAD-WG ist ein Objektivadapter für die digitale Standbildkamera von Sony. Lesen Sie
die Bedienungsanleitung vor Inbetriebnahme bitte sorgfältig durch.
Verwendung des Objektivadapters
Verwenden Sie den Objektivadapter, wenn Sie einen Konverter mit 46 mm Durchmesser an
der digitalen Standbildkamera anbringen wollen.
Die digitale Standbildkamera lässt sich mit angebrachtem Objektivadapter auf einem Stativ
montieren.
Auswählen der Seite des Montageteils und Verwenden des
Abstandsstücks
Wählen Sie je nach verwendeter digitaler Standbildkamera die geeignete Seite des
Objektivadapter-Montageteils und stellen Sie fest, ob das Abstandsstück verwendet werden
muss.
Überprüfen Sie vor dem Anbringen des Montageteils unbedingt, welche Seite des
Montageteils zu verwenden ist und ob das Abstandsstück erforderlich ist (siehe Tabelle
unten).
Beim Kauf des Objektivadapters ist das Montageteil so angebracht, dass Seite A verwendet
werden kann. Das Abstandsstück ist ebenfalls angebracht.
*
Deutsch
Оглавление инструкции
- Страница 1 из 3
Restrictions d’utilisation English 4-129-281-01 (1) /Lens Adaptor/ Adaptateur d objectif/ Spécifications VAD-WG The VAD-WG is a lens adaptor for the Sony digital still camera. Read the instructions carefully before use. Using the lens adaptor Use the lens adaptor when attaching a 46 mm diameter
- Страница 2 из 3
ˎ При использовании стороны опоры В, снимите прокладку, прикрепленную к обратной стороне адаптера объектива. (Рисунок ȏ-ȩ) Restrizioni d’uso Svenska VAD-WG är en linsadapter för Sonys digitala stillbildskamera. Läs noggrant igenom bruksanvisningen före bruk. Använda linsadaptern Använd linsadaptern
- Страница 3 из 3