Инструкция для Sony CCD-TRV89E
 1
1 2
2 3
3 4
4 5
5 6
6 7
7 8
8 9
9 10
10 11
11 12
12 13
13 14
14 15
15 16
16 17
17 18
18 19
19 20
20 21
21 22
22 23
23 24
24 25
25 26
26 27
27 28
28 29
29 30
30 31
31 32
32 33
33 34
34 35
35 36
36 37
37 38
38 39
39 40
40 41
41 42
42 43
43 44
44 45
45 46
46 47
47 48
48 49
49 50
50 51
51 52
52 53
53 54
54 55
55 56
56 57
57 58
58 59
59 60
60 61
61 62
62 63
63 64
64 65
65 66
66 67
67 68
68 69
69 70
70 71
71 72
72 73
73 74
74 75
75 76
76 77
77 78
78 79
79 80
80 81
81 82
82 83
83 84
84 85
85 86
86 87
87 88
88 89
89 90
90 91
91 92
92 93
93 94
94 95
95 96
96 97
97 98
98 99
99 100
100 101
101 102
102 103
103 104
104 105
105 106
106 107
107 108
108 109
109 110
110 111
111 112
112 113
113 114
114 115
115 116
116 117
117 118
118 119
119 120
120 121
121 122
122 123
123 124
124 125
125 126
126 127
127 128
128 129
129 130
130 131
131 132
132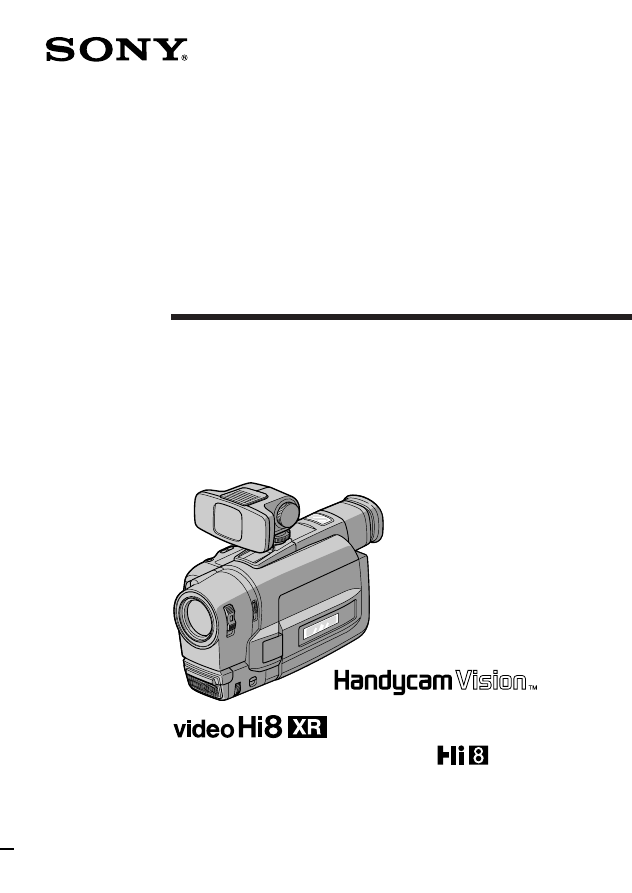
©1998 by Sony Corporation
CCD-TRV89E/TRV99E
CCD-TRV99E
3-862-054-12 (1)
Video Camera
Recorder
Operat ing Inst ruct ions
Before operating the unit, please read this manual thoroughly,
and retain it for future reference.
Инструкция по эксплуатации
Перед эксплуатацией аппарата внимательно прочтите, пожалуйста,
данное руководство и сохраняйте его для дальнейших справок.
Оглавление инструкции
- Страница 1 из 133
3-862-054-12 (1) Video Camera Recorder Operat ing Inst ruct ions Before operating the unit, please read this manual thoroughly, and retain it for future reference. Инструкция по эксплуатации Перед эксплуатацией аппарата внимательно прочтите, пожалуйста, данное руководство и сохраняйте его для
- Страница 2 из 133
Русский English Welcom e! Добро пожаловать! Congratulations on your purchase of this Sony Handycam Vision™ camcorder. With your Handycam Vision you can capture life’s precious moments with superior picture and sound quality. Your Handycam Vision is loaded with advanced features, but at the same
- Страница 3 из 133
English Table of cont ent s Before you begin Using this manual ................................................... 5 Checking supplied accessories ............................. 7 Getting started Installing and charging the battery pack ............ 8 Inserting a cassette
- Страница 4 из 133
Русский Оглавление Перед началом эксплуатации Использование данного руководства ........... 5 Проверка прилагаемых принадлежностей ... 7 Подготовка к эксплуатации Установка и зарядка батарейного блока ..... 8 Вставка кассеты ........................................... 13 Основные операции Запись с
- Страница 5 из 133
Перед началом эксплуатации Bef ore you begin Using t his m anual CCD- TRV89E TRV99E B/W colour — r Типы различий Auto date r — CCD- Index — r Видоискатель Zero memory — r LASER LINK — r r — Viewfinder LASER LINK TRV89E Перед началом эксплуатации Types of dif f erences Инструкции в данном
- Страница 6 из 133
Using t his m anual Not e on TV colour syst em s TV colour systems differ from country to country. To view your recordings on a TV, you need a PAL system-based TV. Precaut ion on copyright Television programmes, films, video tapes, and other materials may be copyrighted. Unauthorized recording of
- Страница 7 из 133
Checking supplied accessories Check that the following accessories are supplied with your camcorder. RM T-708 Проверьте, что следующие принадлежности прилагаются к Вашей видеокамере. 2 Before you begin 1 RM T-717 Проверка прилагаемых принадлежностей or/ или 4 7 8 1 Wireless Remote Commander (1) (p.
- Страница 8 из 133
Подготовка к эксплуатации Get t ing st art ed Installing and charging the battery pack Before using your camcorder, you first need to install and charge the battery pack. This camcorder operates only with the “InfoLITHIUM” battery pack. “InfoLITHIUM” is a trademark of Sony Corporation. Inst alling
- Страница 9 из 133
Inst alling and charging t he bat t ery pack Уcтaнoвка и зарядка батарейного блока Charging t he bat t ery pack Зарядка батарейного блока Подготовка к эксплуатации Заряжайте батарейный блок на плоской поверхности, неподверженной вибрации. Батарейный блок слегка заряжен на заводе. (1) Откройте
- Страница 10 из 133
Inst alling and charging t he bat t ery pack Notes • “– – – min” appears in the display window until the camcorder calculates remaining battery time. • Remaining battery time indication in the display window roughly indicates the recording time with the viewfinder. Use it as a guide. It may differ
- Страница 11 из 133
Inst alling and charging t he bat t ery pack Bat t ery lif e Upper numbers are the time when recording with the viewfinder. Lower numbers are the time when recording with the LCD screen. Using both will further reduce recording time. Continuous Typical recording recording time* time* * Playing time
- Страница 12 из 133
Inst alling and charging t he bat t ery pack Уcтaнoвка и зарядка батарейного блока To rem ove t he bat t ery pack Примечания к индикации оставшегося времени работы батарейного блока во время записи. • Оставшееся время работы батарейного блока отображается в видоискателе или на экране ЖКД. Однако,
- Страница 13 из 133
Insert ing a casset t e 2 3 EJECT PUSH To eject t he casset t e Для выталкивания кассеты While pressing the small blue button on the EJECT switch, slide it in the direction of the arrow. Нажимая маленькую синюю кнопку на выключателе EJECT, сдвиньте его в направлении стрелки. To prevent accident al
- Страница 14 из 133
Основные операции Basic operat ions Cam era recording Make sure that the power source is installed and a cassette is inserted and that the START/STOP MODE switch inside the LCD panel is set to . Before you record one-time events, you may want to make a trial recording to make sure that the
- Страница 15 из 133
Запись с помощью видеокамеры Cam era recording To st op recording m om ent arily [a] Для временной остановки записи [a] Press START/STOP again. The “STBY” indicator appears in the viewfinder (Standby mode). Снова нажмите START/STOP. Индикатор “STBY” появляется в видоискателе (режим готовности). To
- Страница 16 из 133
Cam era recording Note on the lighting aperture – CCD-TRV99E only If direct sunlight enters the lighting aperture, the picture in the viewfinder appears brighter. When this happens, colours in the viewfinder may change. Примечание к световой апертуре – Только CCD-TRV99E Если прямые солнечные лучи
- Страница 17 из 133
Запись с помощью видеокамеры Cam era recording Zooming is a recording technique that lets you change the size of the subject in the scene. For more professional-looking recordings, use the zoom function sparingly. “T” side: for telephoto (subject appears closer) “W” side: for wide-angle (subject
- Страница 18 из 133
Запись с помощью видеокамеры Cam era recording Zoom ing speed (Variable speed zoom ing) Скорость наезда видеокамеры (наезд с различной скоростью) Move the power zoom lever a little for a slower zoom, move it further for a faster zoom. Передвиньте рычаг приводного трансфокатора немного для
- Страница 19 из 133
Cam era recording Запись с помощью видеокамеры Select ing t he START/STOP m ode Выбор режима START/STOP START/STOP MODE CK LO CK LO STA STA 5 SEC ANTI GROUND SHOOTING 3 ND ND BY ••••• BY START/STOP START/STOP STBY Основные операции 2 Ваша видеокамера имеет три режима. Эти режимы позволяют Вам снять
- Страница 20 из 133
Запись с помощью видеокамеры Cam era recording Shoot ing w it h t he LCD screen You can also record the picture while looking at the LCD screen. When using the LCD screen, the viewfinder turns off automatically. You cannot monitor the sound from the speaker during recording. (1) While pressing
- Страница 21 из 133
Cam era recording [a] Примечания к панели ЖКД • При закрывании панели ЖКД поворачивайте ее вертикально до тех пор, пока она не защелкнется [a]. • При вращении панели ЖКД двигайте ее всегда вертикально; или в противном случае корпус видеокамеры может быть поврежден или панель ЖКД может быть закрыта
- Страница 22 из 133
Советы для лучшей съемки Hint s f or bet t er shoot ing For hand-held shots, you’ll get better results by holding the camcorder according to the following suggestions: • Hold the camcorder firmly and secure it with the grip strap so that you can easily manipulate the controls with your thumb. Для
- Страница 23 из 133
Hint s f or bet t er shoot ing [c] Предосторожности к видоискателю и панели ЖКД • Не поднимайте видеокамеру за видоискатель или панель ЖКД [c]. • Не распологайте видеокамеру так, чтобы объектив или экран ЖКД были направлены в сторону солнца. Внутренние части видоискателя или панели ЖКД могут быть
- Страница 24 из 133
Checking t he recorded pict ure Using EDITSEARCH, you can review the last recorded scene or check the recorded picture in the viewfinder or on the LCD screen. (1) While pressing the small green button on the POWER switch, set it to CAMERA. (2) Turn STANDBY up to STANDBY. (3) Press the – (Œ) side of
- Страница 25 из 133
Checking t he recorded pict ure Проверка записанного изображения To st op playback Для остановки воспроизведения Release EDITSEARCH. Отпустите EDITSEARCH. To go back t o t he last recorded point af t er edit search Для возвращения к последней записанной точке после выполнения монтажного поиска To
- Страница 26 из 133
Playing back a t ape You can monitor the playback picture on the LCD screen. (1) While pressing the small green button on the POWER switch, set it to VTR. The video control buttons light up. (2) Insert the recorded tape with the window facing out. (3) While pressing OPEN, open the LCD panel. Adjust
- Страница 27 из 133
Playing back a t ape Воспроизведение ленты When m onit oring on t he LCD screen При просмотре на экране ЖКД You can turn the LCD panel over and move back to the camcorder with the LCD screen facing out [a]. You can adjust the angle of the LCD screen by turning the LCD screen up to 15 degrees [b].
- Страница 28 из 133
Playing back a t ape Воспроизведение ленты Various playback m odes Различные режимы воспроизведения You can enjoy clear pictures during still, slow and picture search. (Crystal-clear still/ slow / picture search) To view a st ill pict ure (playback pause) Press P during playback. To resume
- Страница 29 из 133
Playing back a t ape Воспроизведение ленты Для покадрового просмотра изображения – CCD-TRV99E only Press '/< or >/7 on the Remote Commander in playback pause mode. If you keep pressing the button, you can view the picture at 1/25 speed. To resume normal playback, press (. – Только CCD-TRV99E
- Страница 30 из 133
Воспроизведение ленты Playing back a t ape To display t he dat e or t im e w hen you recorded Press DATE or TIME on the camcorder. To make the date or time disappear, press it again. To display the date and time when you recorded, press TIME (or DATE) after pressing DATE (or TIME). To make the date
- Страница 31 из 133
Searching f or t he end of t he pict ure If you start recording after using END SEARCH Occasionally, the transition between the last scene you recorded and the next scene may not be smooth. 2 Основные операции 1 Вы можете перейти к концу записанной части после записи и воспроизведения ленты для
- Страница 32 из 133
Advanced operat ions Using alt ernat ive pow er sources Использование альтернативных источников питания You can choose any of the following power sources for your camcorder: battery pack, the mains, alkaline batteries and 12/24 V car battery. Choose the appropriate power source depending on where
- Страница 33 из 133
Using alt ernat ive pow er sources WARNING The mains lead must only be changed at a qualified service shop. PRECAUTION The set is not disconnected from the AC power source (mains) as long as it is connected to the mains, even if the set itself has been turned off. Using a car bat t ery To remove
- Страница 34 из 133
Changing t he m ode set t ings You can change the mode settings in the menu system to further enjoy the features and functions of the camcorder. (1) Press MENU to display the menu. (2) Turn the control dial to select the desired icon in the left side of the menu, then press the dial. (3) Turn the
- Страница 35 из 133
Changing t he m ode set t ings Note on the menu display Depending on the model of your camcorder, the menu display may be different from that in this illustration. Select ing t he m ode set t ing of each it em It em s f or bot h CAM ERA and VTR m odes LCD COLOUR* Select this item to adjust the
- Страница 36 из 133
Changing t he m ode set t ings Ò REM AIN* <AUTO/ ON> • Select AUTO when you want to display the remaining tape bar •for about 8 seconds after the camcorder is turned on and calculates the remainder of the tape. •for about 8 seconds after a cassette is inserted and the camcorder calculates the
- Страница 37 из 133
Changing t he m ode set t ings LTR SIZE* <NORM AL/ 2x> •Normally select NORMAL. •Select 2x to display selected menu item by twice size of normal. BEEP* <ON/ OFF> •Select ON so that beeps sound when you start/ stop recording, etc. •Select OFF when you do not want to hear the beep sound. INDICATOR*
- Страница 38 из 133
Changing t he m ode set t ings It em s f or CAM ERA m ode only D ZOOM * <ON/ OFF> •Select ON to activate digital zooming. •Select OFF to not use the digital zoom. The camcorder goes back to 18x zoom. 16:9WIDE* <OFF/ CINEM A/ 16:9FULL> •Normally select OFF. •Select CINEMA to record in CINEMA mode.
- Страница 39 из 133
Changing t he m ode set t ings Изменение установок режимов AUTO DATE* <ON/ OFF> (CCD-TRV89E only) •Select ON to record the date for 10 seconds after recording has started. •Select OFF to not record the date. AUTO DATE* <ON/OFF> (только CCDTRV89E) • Выберите ON для записи даты в течение 10 секунд
- Страница 40 из 133
Changing t he m ode set t ings Изменение установок режимов It em s f or VTR m ode only Установки только для режима VTR HiFi SOUND <STEREO/ 1/ 2> •Normally select STEREO. •Select 1 or 2 to play back a dual sound track tape. HiFi SOUND <STEREO/1/2> • Обычно выбирайте STEREO. • Выберите 1 или 2 для
- Страница 41 из 133
Shoot ing w it h backlight ing When you shoot a subject with the light source behind the subject or a subject with a light background, use the BACK LIGHT function. Press BACK LIGHT. The c indicator appears in the viewfinder or on the LCD screen. Съемка с задней подсветкой Когда Вы снимаете объект с
- Страница 42 из 133
Using t he FADER f unct ion Использование фунции FADER Select ing t he f ader f unct ion Выбор функции введения/ выведения изображения You can fade in or out to give your recording a professional appearance. When the picture fades in, the sound gradually increases. When the picture fades out, the
- Страница 43 из 133
Using t he FADER f unct ion Использование фунции FADER Using t he f ader f unct ion Использование функции введения/ выведения изображения When f ading in [a] (1) While the camcorder is in Standby mode, press FADER until the desired fade indicator flashes. (2) Press START/STOP to start recording.
- Страница 44 из 133
Using t he FADER f unct ion To cancel t he f ader f unct ion Before pressing START/STOP, press FADER until the indicator disappears. When the date, time or title is displayed The date, time and title do not fade in or fade out. When the START/ STOP M ODE sw itch is set to 5SEC or You cannot use the
- Страница 45 из 133
The NightShot function enables you to shoot a subject in a dark place. You can achieve a satisfactory recording of the ecology of nocturnal animals for observation with this function. This function may record picture nearly in monochrome. Функция ночной съемки позволяет Вам производить съемку
- Страница 46 из 133
Запись фотографий Phot o recording You can record a still picture like a photograph for about seven seconds. This mode is useful when you want to enjoy a picture such as a photograph or when you print a picture using a video printer (not supplied). We recommend you to use the video flash light (not
- Страница 47 из 133
Phot o recording Усовершенствованные операции Примечания к записи фотографий • Во время записи фотографий, Вы не можете изменять режим или установку следующих функций. – Функции с использованием кнопки DIGITAL EFFECT – Функции с использованием кнопки FADER – Функции с использованием кнопки PROGRAM
- Страница 48 из 133
Using t he w ide m ode f unct ion Использование функции широкоформатного режима Select ing t he desired m ode Выбор желаемого режима You can record a cinemalike picture (CINEMA) or a 16:9 wide picture to watch on the 16:9 widescreen TV (16:9 FULL). Вы можете записывать изображение как в кинотеатре
- Страница 49 из 133
Using t he w ide m ode f unct ion Using t he w ide m ode f unct ion You can select the wide mode (OFF, CINEMA, 16:9FULL) in the menu system (p. 34). To cancel w ide m ode Использование функции широкоформатного режима Использование функции широкоформатного режима Вы можете выбрать широкоформатный
- Страница 50 из 133
Using t he PROGRAM AE f unct ion Использование функции PROGRAM AE Select ing t he best m ode Выбор наилучшего режима You can select one of seven PROGRAM AE (Auto Exposure) modes to suit your shooting situation, referring to the following. a A Spotlight mode For subjects in spotlight, such as at the
- Страница 51 из 133
Using t he PROGRAM AE f unct ion Использование функции PROGRAM AE Using t he PROGRAM AE f unct ion Использование функции PROGRAM AE (1) Нажмите PROGRAM AE. (2) Поверните регулировочный диск для выбора желаемого режима PROGRAM AE, а затем нажмите регулировочный диск. (1) Press PROGRAM AE. (2) Turn
- Страница 52 из 133
Superimposing a still picture on a moving picture Using the still function, you can record a still picture to be superimposed on a moving picture. The sound is recorded normally. (1) While the camcorder is in Standby mode or recording mode, press DIGITAL EFFECT and turn the control dial until the
- Страница 53 из 133
Using the flash motion function, you can record still pictures successively at constant intervals. The sound is recorded normally. (1) While the camcorder is in Standby mode or recording mode, press DIGITAL EFFECT and turn the control dial until the FLASH indicator flashes. (2) Press the control
- Страница 54 из 133
Recording st ill pict ures successively To cancel t he f lash m ot ion f unct ion Press DIGITAL EFFECT. Последовательная запись неподвижных изображений Для отмены функции периодического движения Нажмите DIGITAL EFFECT. Notes on the flash motion function • You cannot use the following functions
- Страница 55 из 133
Replacing a bright er port ion of a st ill pict ure w it h a m oving pict ure [a] still picture [b]moving picture (1) Когда видеокамера будет находиться в режиме готовности или в режиме записи, нажмите DIGITAL EFFECT и поворачивайте регулировочный диск до тех пор, пока индикатор LUMI не будет
- Страница 56 из 133
Adding an incident al im age t o pict ures Добавление побочного изображения к основному Using the trail function, you can record the picture which leaves an incidental image, such as a trail. The sound is recorded normally. You can adjust the vanishing time of the incidental image with the control
- Страница 57 из 133
Using slow shut t er 1 Shutter speed 1/25 1/12 1/6 1/3 DIGITAL EFFECT SLOW SHTR 2 SLOW SHTR 1 3 To cancel t he slow shut t er f unct ion Для отмены функции медленного затвора Press DIGITAL EFFECT. Нажмите DIGITAL EFFECT. When recording w it h t he slow shut t er f unct ion Усовершенствованные
- Страница 58 из 133
Adding an old movie type atmosphere to pictures Using the old movie function, you can record the picture such as an old movie. The camcorder automatically sets the wide mode to CINEMA, picture effect to SEPIA, and the appropriate shutter speed. (1) While the camcorder is in Standby mode or
- Страница 59 из 133
Focusing m anually Ручная фокусировка When t o use m anual f ocus Когда использовать ручную фокусировку In the following cases you should obtain better results by adjusting the focus manually. [a] [b] В следующих случаях Вы можете получить лучшие результаты, отрегулировав фокусировку вручную. [c]
- Страница 60 из 133
Focusing m anually Ручная фокусировка Focusing m anually Ручная фокусировка When focusing manually, first focus in telephoto before recording, and then reset the shot length. (1) Set FOCUS to MANUAL. The f indicator appears in the viewfinder or on the LCD screen. (2) Move the power zoom lever to
- Страница 61 из 133
Enjoying pict ure eff ect Наслаждение эффектами изображений Select ing pict ure ef f ect Выбор эффекта изображения You can make pictures like those of television with the Picture Effect function. [a] [b] [c] Вы можете сделать изображение похожим на те, что передают по телевидению с помощью функции
- Страница 62 из 133
Наслаждение эффектами изображений Enjoying pict ure ef f ect Использование функции эффектов изображения Using pict ure ef f ect f unct ion (1) Press PICTURE EFFECT. (2) Turn the control dial to select the desired picture effect mode. 1 PICTURE EFFECT (1) Нажмите PICTURE EFFECT. (2) Поверните
- Страница 63 из 133
Adjust ing t he exposure Регулировка экспозиции When t o adjust t he exposure Когда требуется регулировать экспозицию Adjust the exposure manually under the following cases. Отрегулируйте экспозицию вручную в следующих случаях. [a] Adjust ing t he exposure (1) Press EXPOSURE. (2) Turn the control
- Страница 64 из 133
Adjust ing t he exposure Shooting w ith the sun behind you If the light source is behind your subject, or in the following situations, the subject will be recorded too dark. • The subject is indoors and there is a window behind the subject. • Bright light sources are included in the scene. • When
- Страница 65 из 133
Superim posing a t it le Наложение надписи Вы можете выбирать из восьми предварительно установленных надписей и двух совбственных надписей. Вы можете также выбирать язык, цвет, размер и положение надписей. You can select one of eight preset titles and two custom titles. You can also select the
- Страница 66 из 133
Superim posing a t it le To superim pose t he t it le f rom beginning After step 7, press START/STOP to start recording. To superim pose t he t it le w hile you are recording After pressing START/STOP to start recording, start from step 1. In this case, beep is not heard. To select t he language of
- Страница 67 из 133
Создание Ваших собственных надписей M aking your ow n t it les TITLE 2 3 TITLE SET CUSTOM1 " – – – – – – – – – – ··" CUSTOM2 " – – – – – – – – – – ··" TITLE SET [TITLE] : END [TITLE] : END TITLE SET TITLE SET –––––––––––––––––––– –––––––––––––––––––– RETURN –––––––––––––––––––– ––––––––––––––––––––
- Страница 68 из 133
M aking your ow n t it les To edit a t it le you have st ored In step 3, select CUSTOM1 or CUSTOM2, depending on which title you want to edit, then change the title. Note You can not enter over 20 characters title. If you take 5 minutes or longer to enter characters w hile a cassette is in the
- Страница 69 из 133
Re-recording a pict ure in t he m iddle of a recorded t ape Перезапись изображения в середине записанной ленты 1 [b] 3 EDITSEARCH 4 2 STBY 0:00:00 COUNTER RESET Усовершенствованные операции [a] (1) Когда видеокамера находится в режиме готовности, держите нажатой сторону + (воспроизведение вперед)
- Страница 70 из 133
Перезапись изображения в середине записанной ленты Re-recording a pict ure in t he m iddle of a recorded t ape Notes on re-recording • The picture and the sound may be distorted at the end of the inserted portion when it is played back. • If you re-record on the portion which contains non-recorded
- Страница 71 из 133
Оптимизация состояния записи Opt im izing t he recording condit ion MENU 2 TAPE SET SP REC MODE ORC TO SET REMAIN COUNTER RETURN TAPE SET REC MODE ORC TO SET REMAIN COUNTER 3 TAPE SET REC MODE ORC TO SET REMAIN COUNTER RETURN 4 START/STOP KEY STBY 0:00:00 CK LO ORC STA ND Усовершенствованные
- Страница 72 из 133
Releasing the STEADY SHOT function Отключение функции STEADY SHOT When the Steady Shot function is working, the camcorder compensates for camera-shake. Когда работает функция устойчивой съемки, видеокамера осуществляет компенсацию дрожания видеокамеры. You can release the Steady Shot function when
- Страница 73 из 133
Wat ching on a TV screen Просмотр на экране телевизора Connect ing direct ly t o a TV/VCR w it h Video/Audio input jacks Подсоединение прямо к телевизору/КВМ с входными гнездами аудио/видео Если Ваш телевизор или КВМ имеет гнездо S-видео, подсоедините с помощью кабеля Sвидеосигналов (не
- Страница 74 из 133
Wat ching on a TV screen Просмотр на экране телевизора Using t he AV cordless IR receiver Использование беспроводного ИК аудиовидеоприемника – CCD-TRV99E only – Только CCD-TRV99E Once you connect the AV cordless IR receiver (not supplied) having the LASER LINK mark to your TV or VCR, you can easily
- Страница 75 из 133
Wat ching on a TV screen ПРИМЕЧАНИЕ Когда функция LASER LINK активизирована (лампочка кнопки LASER LINK горит), видеокамера потребляет питание. Нажмите и выключите кнопку LASER LINK, если данная функция не требуется. Усовершенствованные операции Note When LASER LINK is activated (the LASER LINK
- Страница 76 из 133
Enjoying digital effect during playback During playback, you can process a scene using the digital effect functions; Still, Flash motion, Luminancekey and Trail. For the features of each function, refer to previous pages. You can watch the processed picture on a TV or use it for editing on other
- Страница 77 из 133
Поиск границ записанных дат Searching the boundaries of recorded date – Только CCD-TRV99E You can search for the boundary between recording dates using the Data Code automatically recorded on the tape. There are two modes: •Searching for the beginning of a specific date, and playing back from there
- Страница 78 из 133
Searching t he boundaries of recorded dat e Поиск границ записанных дат To scan t he beginning of all days Для сканирования начала всех дат (1) Set the POWER switch to VTR. (2) Press DATE on the Remote Commander twice. (3) Press 0 or ). Date Scan starts. (1) Установите выключатель POWER в положение
- Страница 79 из 133
Ret urning t o a preregist ered posit ion Возврат к предварительно зарегистрированной позиции Используя пульт дистанционного управления, Вы можете легко вернуться к желаемой точке ленты после воспроизведения. Используйте счетчик ленты. Если появляется временной код RC, установите COUNTER на NORMAL
- Страница 80 из 133
Ret urning t o a pre-regist ered posit ion Notes on ZERO M EM • When you press ZERO MEM, the counter’s zero point is memorized. Press ZERO MEM again before rewinding to cancel the memory. • This function is cancelled automatically once the tape is rewound or advanced to the point you
- Страница 81 из 133
Locat ing t he m arking posit ion Нахождение отмеченной позиции When m arking during recording or playback При отметке во время записи или воспроизведения Press INDEX MARK on the Remote Commander at the point you want to locate later. Нажмите INDEX MARK на пульте дистанционного управления в точке,
- Страница 82 из 133
Locat ing t he m arking posit ion Scanning t he beginning of each m arking posit ion – index scan (1) Press INDEX on the Remote Commander during normal playback. (2) Press 0 or ). The tape rewinds or advances rapidly and plays back for approximately 10 seconds from the point on which the index
- Страница 83 из 133
Locat ing t he m arking posit ion Locat ing t he desired m arking posit ion – index search [a] the current position [b] the INDEX number Нахождение желаемой отмеченной позиции Индексный поиск (1) Нажмите INDEX на пульте дистанционного управления в режиме останова или воспроизведения. (2)
- Страница 84 из 133
Locat ing t he m arking posit ion Нахождение отмеченной позиции Erasing an index signal Стирание индексного сигнала (1) Locate the index signal to be erased using the index scan or index search function. (2) Press ERASE on the Remote Commander within 2 to 10 seconds while the desired programme
- Страница 85 из 133
Запись временного кода RC на записанной ленте Writ ing t he RC Tim e code on a recorded t ape Вы можете записать временной код RC на записанной ленте. Используйте пульт дистанционного управления. Перед тем, как Вы начнете, мы рекомендуем установить COUNTER на TIME CODE в системе меню, так чтобы Вы
- Страница 86 из 133
Writ ing t he RC Tim e code on a recorded t ape Запись временного кода RC на записанной ленте To w rit e t he RC t im e code f rom t he end of t he RC t im e code recorded port ion Для записи временного кода RC от конца записанной части с временным кодом RC Rewind the tape to the portion on which
- Страница 87 из 133
Edit ing ont o anot her t ape You can create your own video programme by editing with any other h 8 mm, H Hi8, j VHS, k S-VHS, VHSC, K S-VHSC or l Betamax VCR that has video/audio inputs. Bef ore edit ing St art ing edit ing To edit m ore scenes Repeat steps 2 to 4. To superim pose t he t it le w
- Страница 88 из 133
Запись с КВМ или телевизора Recording f rom a VCR or TV You can record a tape from another VCR or a TV programme from a TV that has video/audio outputs. Connect the camcorder to the VCR or TV using the supplied A/V cable. Turn down the volume of the camcorder while editing. Otherwise, picture
- Страница 89 из 133
Recording f rom a VCR or TV Note on recording You cannot record a picture that has a copyright control signal for copyright protection of software. “COPY INHIBIT” appears if you try to record such a picture. Replacing recording on a t ape – Insert Edit ing Note on the inserted picture The picture
- Страница 90 из 133
Addit ional inf orm at ion Changing the lithium battery in the camcorder Your camcorder is supplied with a lithium battery installed. When the battery becomes weak or dead, the I indicator flashes in the viewfinder for about 5 seconds when you set the POWER switch to CAMERA. In this case, replace
- Страница 91 из 133
Замена литиевой батарейки в видеокамере Changing t he lit hium bat t ery in t he cam corder ПРЕДУПРЕЖДЕНИЕ При неправильном обращении батарейка может взорваться. Не перезаряжайте, не разбирайте и не бросайте батарейку в огонь. WARNING The battery may explode if mistreated. Do not recharge,
- Страница 92 из 133
Reset t ing t he dat e and t im e You can reset the date and time in the menu system. (1) While the camcorder is in Standby mode, press MENU to display the menu. , then press (2) Turn the control dial to select the dial. (3) Turn the control dial to select CLOCK SET, then press the dial. (4) Turn
- Страница 93 из 133
Sim ple set t ing of clock by t im e diff erence You can easily set the clock for a local time by a time difference in the menu system. (1) While the camcorder is the standby mode, press MENU to display the menu. , then press (2) Turn the control dial to select the dial. (3) Turn the control dial
- Страница 94 из 133
Usable casset t es and playback m odes Используемые кассеты и режимы воспроизведения Select ing casset t e t ypes Выбор типа кассеты This Hi8 system is an extension of the standard 8 mm system, and was developed to realize higher picture quality. You can use either Hi8 or standard 8 mm video
- Страница 95 из 133
Usable casset t es and playback m odes Используемые кассеты и режимы воспроизведения When you play back Когда Вы осуществляете воспроизведение The playback mode (SP/LP) and system (Hi8/ standard 8 mm) are selected automatically according to the format in which the tape has been recorded. The
- Страница 96 из 133
Tips f or using t he bat t ery pack This section shows you how you can get the most out of your battery pack. Preparing t he bat t ery pack Советы по использованию батарейного блока Данный раздел показывает, как Вы можете получить наибольшую отдачу от Вашего батарейного блока Подготовка батарейного
- Страница 97 из 133
Tips f or using t he bat t ery pack Советы по использованию батарейного блока Not es on t he rechargeable bat t ery pack Примечания к перезаряжаемому батарейному блоку Caut ion Предостережение Never leave the battery pack in temperatures above 60°C (140°F), such as in a car parked in the sun or
- Страница 98 из 133
Tips f or using t he bat t ery pack Советы по использованию батарейного блока Not es on t he “ Inf oLITHIUM ” bat t ery pack Примечания к батарейному блоку “InfoLITHIUM” What is “ Inf oLITHIUM ” Что такое “InfoLITHIUM” The “InfoLITHIUM” is a lithium ion battery pack which can exchange data with
- Страница 99 из 133
Tips f or using t he bat t ery pack ** Full charge: Charging until FULL appears in the display window. Почему индикация оставшегося заряда батарейного блока не соответствует времени непрерывной записи, указанном в инструкции по эксплуатации На время записи влияет температура окружающей среды и
- Страница 100 из 133
M aintenance information and precautions Информация по уходу за аппаратом и предосторожности M oist ure condensat ion Конденсация влаги If the camcorder is brought directly from a cold place to a warm place, moisture may condense inside the camcorder, on the surface of the tape, or on the lens. In
- Страница 101 из 133
M aint enance inf orm at ion and precaut ions Информация по уходу за аппаратом и предосторожности Video head cleaning Очистка видеоголовок To ensure normal recording and clear pictures, clean the video heads. When the v indicator and CLEANING CASSETTE” message appear “ one after another or playback
- Страница 102 из 133
M aint enance inf orm at ion and precaut ions Информация по уходу за аппаратом и предосторожности Rem oving dust f rom inside t he view f inder Удаление пыли из видоискателя – CCD-TRV89E only (1) Remove the screw with a screwdriver (not supplied). Then, while sliding the RELEASE knob, turn the
- Страница 103 из 133
M aint enance inf orm at ion and precaut ions Информация по уходу за аппаратом и предосторожности Precaut ions Предосторожности • Эксплуатируйте видеокамеру от 7,2 В (батарейный блок) или 8,4 В (сетевой адаптер перем. тока). • Для эксплуатации от постоянного тока или переменного тока используйте
- Страница 104 из 133
M aint enance inf orm at ion and precaut ions Информация по уходу за аппаратом и предосторожности Cam corder care Уход за видеокамерой • When the camcorder is not to be used for a long time, remove the tape. Periodically turn on the power, operate the camera and player sections and play back a tape
- Страница 105 из 133
Информация по уходу за аппаратом и предосторожности •Do not apply mechanical shock or drop the unit. •While the unit is in use, particularly during charging, keep it away from AM receivers and video equipment because it will disturb AM reception and video operation. •The unit becomes warm while in
- Страница 106 из 133
Using your cam corder abroad Each country or area has its own electric and TV colour systems. Before using your camcorder abroad, check the following points. Pow er sources You can use your camcorder in any country or area with the supplied AC power adaptor within 100 V to 240 V AC, 50/60 Hz. Dif f
- Страница 107 из 133
English Trouble check If you run into any problem using the camcorder, use the following table to troubleshoot the problem. Should the difficulty persist, disconnect the power source and contact your Sony dealer or local authorized Sony service facility. Cam corder Pow er Symptom Cause and/ or
- Страница 108 из 133
Trouble check Symptom Cause and/ or Corrective Actions • The START/STOP MODE switch is set to 5SEC or . m Set it to . (p. 19) The cassette cannot be removed from • The battery is dead. the holder. m Use a charged battery pack or the AC power adaptor. (p. 9, 32) { and 6 indicators flash and no •
- Страница 109 из 133
Trouble check Symptom A vertical band appears when a subject such as lights or a candle flame is shot against a dark background. Cause and/ or Corrective Actions • The contrast between the subject and background is too high. The camcorder is not malfunctioning. m Change locations. The playback
- Страница 110 из 133
Русский Проверка неисправностей Если у Вас возникла какая-либо проблема при использовании видеокамеры, воспользуйтесь следующей таблицей для отыскания и устранения проблемы. Если трудности все еще остаются, то отсоедините источник питания и обратитесь к Вашему дилеру Sony или на местное
- Страница 111 из 133
Проверка неисправностей Признак Причина и/или действия по устранению • Переключатель START/STOP MODE установлен в положение 5SEC или . m Установите его в положение . (стр. 19) • Батарейный блок полностью разряжен. Кассета не может быть вынута из держателя. m Используйте заряженный батарейный блок
- Страница 112 из 133
Проверка неисправностей Признак Вертикальная полоса появляется, если такие объекты, как источники света или пламя свечи, снимаются на темном фоне. Причина и/или действия по устранению • Слишком высокий контраст между объектом и фоном. Видеокамера не является неисправной. m Измените позицию съемки.
- Страница 113 из 133
English Self -diagnosis display The camcorder has a self-diagnosis display. This function displays the camcorder’s condition with five digits (a combination of a letter and figures) in the viewfinder, on the LCD screen or in the display window. If this occurs, check the following code chart. The
- Страница 114 из 133
Русский Дисплей самодиагностики Видеокамера имеет дисплей самодиагностики. Данная функция отображает состояние видеокамеры с помощью пяти знаков (комбинации одной буквы и цифр) в видоискателе, на экране ЖКД или в окошке дисплея. Если это случится, выполните проверку в соответствии со следующей
- Страница 115 из 133
English Specif icat ions Video cam era recorder Syst em General Pow er requirements 7.2 V (battery pack) 8.4 V (AC power adaptor) Average pow er consumption (w hen using the battery pack) During camera recording using LCD 3.9 W Viewfinder 2.7 W Operating temperature 0°C to 40°C (32°F to 104°F)
- Страница 116 из 133
Русский Технические характеристики Видеокамера Система Система видеозаписи 2 вращающиеся головки Система ЧМ наклонной механической развертки Система аудиозаписи Вращающиеся головки, система ЧМ Видеосигнал Цветовой сигнал PAL, стандарт CCIR Используемые кассеты Кассеты 8-мм видеоформата Hi8 или 8 мм
- Страница 117 из 133
Ident if ying t he part s Опознавание частей 8 7 1 9 2 0 4 !™ 5 !£ 6 1 Кнопка EDITSEARCH (стр. 24) 2 LASER LINK button (CCD-TRV99E only) (p. 74) 2 Кнопка LASER LINK (только CCDTRV99E) (стр. 74) 3 Lens cover 3 Крышка объектива 4 POWER sw itch (p. 14) 5 FOCUS sw itch (p. 60) 6 NEAR/ FAR dial (p. 60)
- Страница 118 из 133
Ident if ying t he part s Опознавание частей !¢ @™ !∞ @£ @¢ !§ @∞ !¶ @§ !• @¶ !ª @• @º @ª @¡ #º !¢ View finder (p. 15) !¢Видоискатель (стр. 15) !∞ Speaker (p. 27) !∞ Громкоговоритель (стр. 27) !§ LCD screen (p. 20) !§ Экран ЖКД (стр. 20) !¶ LCD BRIGHT buttons (p. 20) !¶ Кнопки LCD BRIGHT (стр. 20)
- Страница 119 из 133
Ident if ying t he part s Опознавание частей #¡ #ª #™ $º #£ $¡ #¢ $™ $£ #§ #¶ $¢ #• $∞ #¡ Кнопка COUNTER RESET (стр. 16) #™ Кнопка TIME (стр. 70) #£ DATE button (p. 70) #£ Кнопка DATE (стр. 70) #¢ DISPLAY button (p. 27) #¢ Кнопка DISPLAY (стр. 27) #∞ TITLE button (p. 65) #∞ Кнопка TITLЕ (стр. 65)
- Страница 120 из 133
Ident if ying t he part s Опознавание частей %™ $§ $¶ $• $ª %£ %º %¢ %¡ %∞ CCD-TRV89E $§ Eyecup RELEASE knob (CCD-TRV89E only) (p. 102) $§ Ручка окуляра RELEASE (только CCDTRV89E) (стр. 102) $¶ EJECT sw itch (p. 13) $¶ Выключатель EJECT (стр. 13) $• LANC l control jack l stands for Local
- Страница 121 из 133
Ident if ying t he part s Опознавание частей %¶ %• %ª ^º %¶ Camera recording/ battery lamp (p. 14) %• LASER LINK emitter (CCD-TRV99E only) (p. 74)/ NightShot Light emitter (p. 45) %ª Remote sensor (p. 123) Aim the Remote Commander here for remote control. ^º M icrophone %§ Гнeздо MIC (PLUG IN
- Страница 122 из 133
Ident if ying t he part s Опознавание частей Rem ot e Com m ander Пульт дистанционного управления The buttons that have the same name on the Remote Commander as on the camcorder function identically. Кнопки пульта дистанционного управления, которые имеют одинаковые наименования с кнопками на
- Страница 123 из 133
Ident if ying t he part s Опознавание частей To prepare t he Rem ot e Com m ander Для подготовки пульта дистанционного управления Insert two R6 (size AA) batteries by matching the + and – on the batteries to the diagram inside the battery compartment. Вставьте две батарейки R6 (размером АА)
- Страница 124 из 133
Ident if ying t he part s Опознавание частей At t aching t he shoulder st rap Прикрепление плечевого ремня Attach the supplied shoulder strap to the hooks for the shoulder strap. 1 2 Прикрепите прилагаемый плечевой ремень к скобам для плечевого ремня. 3 To w at ch t he dem onst rat ion Для
- Страница 125 из 133
Ident if ying t he part s Опознавание частей Operat ion indicat ors Рабочие индикаторы Display w indow /Окошко дисплея View f inder/Видоискатель 40min H SP STBY @™ @§ !∞ 2 !∞ 0:00:00 !§ END SEARCH !¶ @¶ T M.FADER CINEMA SEPIA c„ f AUTO DATE 12:00:00 !• 1 !ª @∞ 3 @º @¡ @™ @£ @¢ !£ 1 Recording mode
- Страница 126 из 133
Опознавание частей Ident if ying t he part s !∞ Time code indicator (CCD-TRV99E only) (p. 85) !∞ Индикатор временного кода (только CCD-TRV99E) (стр. 85) !§ Tape counter (p. 16)/ RC time code indicator (CCD-TRV99E only) (p. 85)/ Self-diagnosis functions indicator (p. 113)/ 5SEC mode indicator (p.
- Страница 127 из 133
Предупреждающие индикаторы Warning indicat ors Если индикаторы мигают или предупреждающие сообщения появляются на экране ЖКД или в видоискателе, то проверьте следующее: ≥≥... :Вы можете слышать зуммерный звуковой сигнал, когда функция BEEP установлена на ON в системе меню. If indicators flash in
- Страница 128 из 133
Warning indicat ors Предупреждающие индикаторы 6 M oisture condensation has occurred. 6 Произошла конденсация влаги. 7 The video heads may be contaminated. 7 Видеоголовки возможно загрязнены. 8 Some other trouble has occurred. Use the self-diagnosis function (p. 113). If the display does not
- Страница 129 из 133
Index A, B F, G, H S Adjusting viewfinder ................ 15 AFM HiFi Sound ................. 40, 94 ANTI GROUND SHOOTING ................................................... 19 Auto focus ................................... 60 Backlight ..................................... 41 Beep
- Страница 130 из 133
Алфавитный указатель А, Б, В П, Р A, B, C, D Автоматическая фокусировка ............................................. 60 Автомобильный аккумулятор ............................................. 33 Временной код ................ 36, 86 Временной код RC ................ 85 Пауза воспроизведения
- Страница 131 из 133
Дополнительная информация 131 Additional information
- Страница 132 из 133
Sony Corporation Printed in Japan
- Страница 133 из 133