Инструкция для Sony CCD-TR3300E
 1
1 2
2 3
3 4
4 5
5 6
6 7
7 8
8 9
9 10
10 11
11 12
12 13
13 14
14 15
15 16
16 17
17 18
18 19
19 20
20 21
21 22
22 23
23 24
24 25
25 26
26 27
27 28
28 29
29 30
30 31
31 32
32 33
33 34
34 35
35 36
36 37
37 38
38 39
39 40
40 41
41 42
42 43
43 44
44 45
45 46
46 47
47 48
48 49
49 50
50 51
51 52
52 53
53 54
54 55
55 56
56 57
57 58
58 59
59 60
60 61
61 62
62 63
63 64
64 65
65 66
66 67
67 68
68 69
69 70
70 71
71 72
72 73
73 74
74 75
75 76
76 77
77 78
78 79
79 80
80 81
81 82
82 83
83 84
84 85
85 86
86 87
87 88
88 89
89 90
90 91
91 92
92 93
93 94
94 95
95 96
96 97
97 98
98 99
99 100
100 101
101 102
102 103
103 104
104 105
105 106
106 107
107 108
108 109
109 110
110 111
111 112
112 113
113 114
114 115
115 116
116 117
117 118
118 119
119 120
120 121
121 122
122 123
123 124
124 125
125 126
126 127
127 128
128 129
129 130
130 131
131 132
132 133
133 134
134 135
135 136
136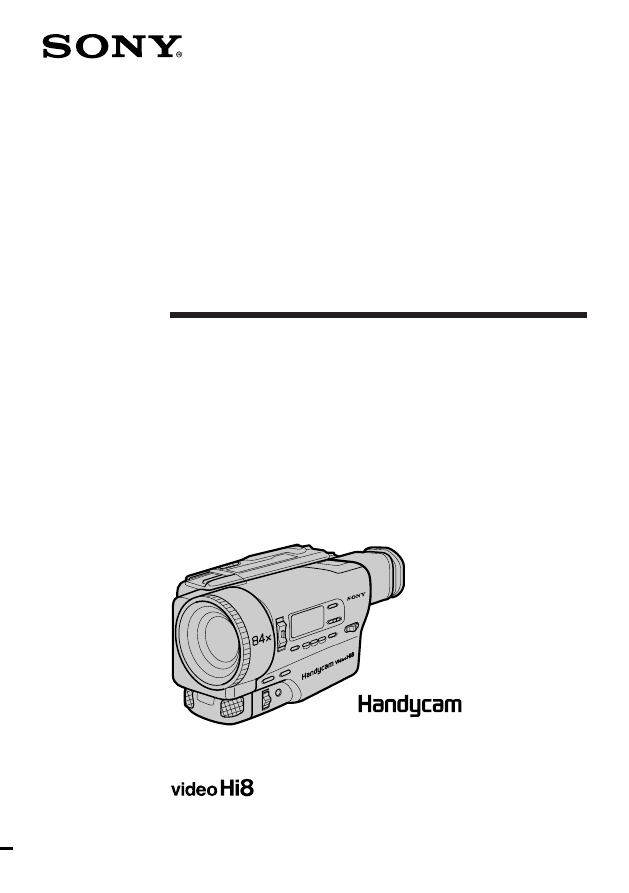
3-856-548-12 (1)
Video Camera
Recorder
Operating Instructions
Before operating the unit, please read this manual thoroughly,
and retain it for future reference.
ИНСТРУКЦИЯ ПО ЭКСПЛУАТАЦИИ
Перед эксплуатацией аппарата внимательно прочтите,
пожалуйста, данное руководство и сохраняйте его для
дальнейших справок.
©1996 by Sony Corporation
CCD-TR2300E/TR3300E
H
CCD-TR3300E
Оглавление инструкции
- Страница 1 из 137
3-856-548-12 (1) Video Camera Recorder Operating Instructions Before operating the unit, please read this manual thoroughly, and retain it for future reference. ИНСТРУКЦИЯ ПО ЭКСПЛУАТАЦИИ Перед эксплуатацией аппарата внимательно прочтите, пожалуйста, данное руководство и сохраняйте его для
- Страница 2 из 137
English Русский Welcome! Добро пожаловать! Congratulations on your purchase of this Sony Handycam® camcorder. With your Handycam you can capture life’s precious moments with superior picture and sound quality. Your Handycam is loaded with advanced features, but at the same time it is very easy to
- Страница 3 из 137
English Table of contents Before you begin Using this manual ................................................... 5 Checking supplied accessories ............................. 7 Basic operations Camera recording ................................................. 13 Using the zoom feature
- Страница 4 из 137
Русский Оглавление Перед начлом эксплуатации Использование данного руководства ........... 5 Проверка прилагаемых принадлежностей .. 7 Подготовка к эксплуатации Зарядка и установка батарейного блока ..... 8 Вставка кассеты ........................................... 12 Основные операции Запись с
- Страница 5 из 137
Before you begin Перед началом эксплуатации Использование данного руководства Using this manual Type of differences Model number CCD-TR2300E CCD-TR3300E Slow Shutter — • Overlap/Wipe — • Digital Effect — 3 modes Инструкции в данном руководстве изложены для двух нижеперечисленных моделей. Перед тем,
- Страница 6 из 137
Использование данного руководства Using this manual Precautions on camcorder care • Do not let sand get into the camcorder. When you use the camcorder on a sandy beach or in a dusty place, protect it from the sand or dust. Sand or dust may cause the unit to malfunction, and sometimes this
- Страница 7 из 137
Checking supplied accessories Check that the following accessories are supplied with your camcorder. Проверка прилагаемых принадлежностей Проверьте, что следующие принадлежности прилагаются к Вашей видеокамере. 2 3 AC-V315 AC-V316 4 5 6 7 8 9 1 Wireless Remote Commander (1) (p.129) 2 NP-F530
- Страница 8 из 137
Getting started Подготовка к эксплуатации Charging and installing the battery pack Зарядка и установка батарейного блока Before using your camcorder, you first need to charge and install the battery pack. To charge the battery pack, use the supplied AC power adaptor. Перед использованием Вашей
- Страница 9 из 137
AC-V315 for CCD-TR3300E AC-V315 для CCD-TR3300E 1 2 Getting started / Подготовка к эксплуатации AC-V316 for CCD-TR2300E AC-V316 для CCD-TR2300E 1 2 Charging time Время зарядки Battery pack Charging time* (min.) Батарейный блок Время зарядки* (мин.) NP-F530 (supplied) 170 (110) NP-F530 (прилагается)
- Страница 10 из 137
Charging and installing the battery pack The available time for a fully charged battery is indicated outside parentheses. The available time for normal charged battery is indicated in parentheses. Battery life will be shorter if you use the camcorder in a cold environment. 1) Approximate continuous
- Страница 11 из 137
Installing the battery pack Установка батарейного блока Совместите канавки батарейного блока с выступами видеокамеры и двигайте батарейный блок до тех пор, пока он не будет захвачен рычагом отблокировки батарейного блока и не защелкнется. To remove the battery pack Для снятия батарейного блока
- Страница 12 из 137
Inserting a cassette Make sure that the power source is installed. When you want to record in the Hi8 system, use Hi8 video cassette H. (1) While pressing the small blue button on the EJECT switch, slide it in the direction of the arrow. The cassette compartment automatically lifts up and opens.
- Страница 13 из 137
Basic operations Основные операции Camera recording 2 POWER CAMERA 3 L OFF Убедитесь, что источник питания установлен и кассета вставлена. Перед тем как Вы начнете запись одноразовых событий, Вы можете захотеть сделать пробную запись для подтверждения, что видеокамера работает правильно. Если Вы
- Страница 14 из 137
Запись с помощью видеокамеры Camera recording To stop recording momentarily [a] Для временной остановки записи [a] Press START/STOP again. The “STBY” indicator appears in the viewfinder (Standby mode). Нажмите START/STOP. Индикатор “STBY” появляется в видоискателе (режим готовности). To finish
- Страница 15 из 137
Note on recording When you record from the beginning of a tape, run the tape for about 15 seconds before starting the actual recording. This will ensure that you won’t miss any start-up scenes when you play back the tape. Notes on the tape counter •The tape counter indicates the recording or
- Страница 16 из 137
Запись с помощью видеокамеры Camera recording Notes on finder power save •The recording continues even when the picture in the viewfinder disappears during recording. •If you set VF PW-SAVE to OFF in the menu system, the picture in the viewfinder does not disappear even when you turn your face away
- Страница 17 из 137
Zooming speed (Variable speed zooming) Скорость наезда видеокамеры (наезд с различной скоростью) Move the power zoom lever a little for a slower zoom, move it further for a faster zoom. Переместите рычаг приводного трансфокатора немного для медленного наезда, переместите его дальше для более
- Страница 18 из 137
Hints for better shooting For hand-held shots, you’ll get better results by holding the camcorder according to the following suggestions: [a] Советы для лучшей съемки Для кадров при удержании видеокамеры в руках Вы получите лучшие результаты, если будете держать видеокамеру в соответствии со
- Страница 19 из 137
If you wear glasses You can bend back the eyecup to get a better view of viewfinder [c]. [c] [d] Notes on the colour viewfinder •The colour viewfinder employs LCD screen made with high-precision technology. However, black points or bright points of light (red, blue, or green) may appear constantly
- Страница 20 из 137
Checking the recorded picture Using EDITSEARCH, you can review the last recorded scene or check the recorded picture in the viewfinder. (1) While pressing the small green button on the POWER switch, set it to CAMERA. (2) Turn STANDBY up. (3) Press the РΠside of EDITSEARCH momentarily; the last
- Страница 21 из 137
Connections for playback Соединения для воспроизведения Вы можете использовать данную видеокамеру в качестве КВМ путем подсоединения ее к Вашему телевизору для воспроизведения. Существует несколько способов для подсоединения видеокамеры к Вашему телевизору. При просмотре изображения путем
- Страница 22 из 137
Соединения для воспроизведения Connections for playback If you connect directly to TV Open the jack cover and connect the camcorder to the inputs on the TV by using the supplied A/ V connecting cable. Set the TV/VCR selector on the TV to VCR. [a ]S -V ID (not supplied)/ (не прилагается) EO [b ]V ID
- Страница 23 из 137
Если Ваш телевизор уже соединен с КВМ Connect the Handycam Station to the LINE IN inputs on the VCR by using the supplied A/V connecting cable. Set the input selector on the VCR to LINE. Set the TV/VCR selector on the TV to VCR. If you are going to connect the Handycam Station using the S video
- Страница 24 из 137
Connections for playback Соединения для воспроизведения To connect the camcorder to the Handycam Station Для подсоединения видеокамеры к станции Handycam (1) Connect the mains lead of the supplied AC power adaptor to mains. (2) Connect the supplied connecting cord to the DC OUT jack on the AC power
- Страница 25 из 137
Caution Do not set the POWER switch to CAMERA. The Handycam Station can be used only for VTR mode. To remove the camcorder (1) Set the POWER switch of the camcorder to OFF. (2) Press RELEASE on the Handycam Station. Предостережение Не устанавливайте выключатель POWER в положение CAMERA. Станция
- Страница 26 из 137
Воспроизведение ленты Playing back a tape You can monitor the playback picture in the viewfinder. You can also monitor a picture on a TV screen, after connecting the camcorder to a TV or VCR. (1) While pressing the small green button on the POWER switch, set it to VTR. The tape transport buttons
- Страница 27 из 137
Using the Handycam Station — CCD-TR3300E only To display the viewfinder screen indicators on the TV Press DISPLAY on the Remote Commander. To erase the indicators, press DISPLAY again. To monitor the sound while viewing the playback picture in the viewfinder Connect headphones (not supplied) to the
- Страница 28 из 137
Playing back a tape To view the picture at double speed For double speed playback in the reverse <, then press x2 on the direction, press Remote Commander during playback. For double speed playback in the forward direction, press >7, then press x2 during playback. To resume normal playback, press
- Страница 29 из 137
Displaying the date or time when you recorded – data code function To display the date when you recorded Press DATE on the camcorder, or press DATA CODE on the Remote Commander. To make the date disappear, press DATE again or DATA CODE twice. To display the time when you recorded Press TIME on the
- Страница 30 из 137
Playing back a tape When bars (––:––:––) appear •A blank portion of the tape is being played back. •The tape was recorded by a camcorder without the Data Code function. •The tape was recorded by a camcorder without having date and time set. •The tape is unreadable due to tape damage or noise. •The
- Страница 31 из 137
Advanced operations Using alternative power sources You can choose any of the following power sources for your camcorder: battery pack, mains, and 12/24 V car battery. Choose the appropriate power source depending on where you want to use your camcorder. Place Power source Accessory to be used
- Страница 32 из 137
Using alternative power sources Использование альтернативных источников питания Using the mains Использование электрической сети To use the supplied AC power adaptor: CCD-TR3300E only: (1) Connect the AC mains lead to mains, then connect the connecting cord to the DC OUT jack on the AC power
- Страница 33 из 137
Notes on the VTR/CAMERA lamp •The VTR/CAMERA lamp will remain lit for a while even if the unit is unplugged after use. This is normal. •If the VTR/CAMERA lamp does not light, disconnect the mains lead. After about 1 minute, reconnect the mains lead. To remove the connecting plate Pull out the
- Страница 34 из 137
Using alternative power sources WARNING The mains lead must only be changed at a qualified service shop. PRECAUTION The set is not disconnected from the AC power source (mains) as long as it is connected to the mains, even if the set itself has been turned off. Using a car battery – CCD-TR3300E
- Страница 35 из 137
Changing the mode settings 1 CAMERA WIND COMMANDER Hi8 COUNTER ORC TO SET REC MODE TITLE COL [MENU] : END 2 MENU MENU MENU VTR Вы можете изменять установки режимов в системе меню для большего наслаждения особенностями и функциями видеокамеры. (1) Нажмите MENU для отображения меню. (2) Поверните
- Страница 36 из 137
Changing the mode settings Изменение установок режимов Selecting the mode setting of each item Выбор режима каждой установки Items for both CAMERA and VTR modes Установки для режимов и CAMERA и VTR COUNTER <NORMAL/TIME CODE> •Normally select NORMAL. •Select TIME CODE to display the RC time code in
- Страница 37 из 137
Hi8 <AUTO/OFF> •Normally select AUTO to have the camcorder automatically set the recording mode (Hi8 or standard 8 mm) depending upon the cassette type being used. •Select OFF to record a Hi8 tape in standard 8 mm format. ORC TO SET* <ORC ON> Select ORC ON to automatically adjust the recording
- Страница 38 из 137
Changing the mode settings Изменение установок режимов Items for VTR mode only Установки только для режима VTR EDIT <ON/OFF> •Select ON to minimize picture deterioration when editing. •Normally select OFF. EDIT <ON/OFF> • Выберите ON для сведения помех к минимуму во время монтажа. • Обычно
- Страница 39 из 137
Recording with the date or time Before you start recording or during recording, press DATE or TIME. You can record the date or time displayed in the viewfinder with the picture. You cannot record the date and time at the same time. Except for the date or time indicator, no indicator in the
- Страница 40 из 137
Fade-in and fade-out You can fade in or out to give your recording a professional appearance. When fading in, the picture gradually fades in from black or mosaic while the sound increases. When fading out, the picture gradually fades to black or mosaic while the sound decreases. When fading in [a]
- Страница 41 из 137
Note on fade indicator — CCD-TR2300E only Each time you press FADER, the fade indicator changes: FADER n M.FADER n no indicator, cyclically. To cancel the fade-in/fade-out function Before pressing START/STOP, press FADER/ OVERLAP (only for CCD-TR3300E), or FADER (only for CCD-TR2300E) until the
- Страница 42 из 137
Overlapping two pictures (CCD-TR3300E only) When you switch from one scene to another, you can overlap the two pictures. With this function, the first scene turns to the second one gradually. You can hear the sound of the second scene gradually as you start recording the second scene. (1) While the
- Страница 43 из 137
Wiping away a still picture (CCD-TR3300E only) When you switch from one scene to another, you can wipe away the still picture. With this function, the first still picture is wiped away from the centre to reveal the moving picture underneath. You can hear the sound of the second scene as you start
- Страница 44 из 137
Wiping away a still picture (CCD-TR3300E only) Notes on wipe •You cannot use the following functions while using the wipe function. Also, while using the following functions, you cannot use the wipe function. – Digital effect – Slow shutter – Title •You can select wipe during recording. •When you
- Страница 45 из 137
Enjoying picture effect Наслаждение эффектами изображения Selecting picture effect Выбор эффекта изображения You can make pictures like those of television with the Picture Effect function. [a] [b] [c] Вы можете сделать изображение похожи на те, что передают по телевидению с помощью функции
- Страница 46 из 137
Enjoying picture effect Using picture effect function (1) Press PICTURE EFFECT. (2) Turn the control dial to select the desired picture effect mode. 1 PICTURE EFFECT Наслаждение эффектами изображения Использование функции эффектов изображения (1) Нажмите PICTURE EFFECT. (2) Поверните регулировочный
- Страница 47 из 137
Recording a still picture (CCD-TR3300E only) 2 DIGITAL EFFECT STILL IIIIII 3 STILL FLASH LUMI. 4 L 1 Вы можете записать неподвижное изображение, похожее на фотографию, или произвести съемку движущегося изображения с наложением неподвижного изображения при нормальной записи звука. (1) Нажмите
- Страница 48 из 137
Recording a still picture (CCD-TR3300E only) To cancel still mode Для отмены режима стоп-кадра Press DIGITAL EFFECT to highlight the still indicator, and press the button again. The still indicator in the viewfinder disappears. Нажмите DIGITAL EFFECT для отображения индикатора стоп-кадра и нажмите
- Страница 49 из 137
Recording still pictures successively (CCD-TR3300E only) Последовательная запись неподвижных изображений (только CCD-TR3300E) Используя функцию периодического движения, Вы можете последовательно записывать неподвижные изображения с постоянными интервалами. Вы можете выбрать интервал путем
- Страница 50 из 137
Recording still pictures successively (CCD-TR3300E only) To cancel the flash motion Press DIGITAL EFFECT to highlight the flash motion indicator, and press the button again. The flash motion indicator in the viewfinder disappears. Notes on the flash motion •The following functions does not work
- Страница 51 из 137
Наложение движущегося изображения на неподвижное изображение (только CCD-TR3300E) Superimposing a moving picture on a still picture (CCD-TR3300E only) (1) Нажмите DIGITAL EFFECT и поверните регулировочный диск для выбора индикатора яркости изображения переднего плана. (2) Нажмите регулировочный
- Страница 52 из 137
Re-recording a picture in the middle of a recorded tape Перезапись изображения в середине записанной ленты You can insert a scene in the middle of a recorded tape by setting the starting and ending points. The previous recorded portion will be erased. If the RC time code appears in the viewfinder,
- Страница 53 из 137
To change the end point Для изменения конечной точки Press ZERO MEM to erase the ZERO MEM indicator, then repeat steps 2 to 5. Нажмите ZERO MEM для стирания индикатора ZERO MEM, а затем повторите пункты со 2 по 5. Note on re-recording The picture and the sound may be distorted at the end of the
- Страница 54 из 137
Using the wide mode function Использование функции широкоформатного режима CINEMA CINEMA Black bands appear at the top and the bottom of the screen, and the viewfinder [a] and a normal TV screen [b] look wide. You can also watch the picture without black bands on a wide-screen TV [c]. Черные полосы
- Страница 55 из 137
Для просмотра ленты, записанной в широкоформатном режиме To watch the tape recorded in CINEMA mode, set the screen mode of the wide-screen TV to zoom mode. To watch the tape recorded in 16:9 FULL mode, set it to full mode. For details, refer to the instruction manual of your TV. Note that the
- Страница 56 из 137
Selecting the START/ STOP mode Your camcorder has two modes besides normal start/stop mode. These modes enable you to take a series of quick shots resulting in a lively video. (1) Set the START/STOP MODE switch to the desired mode. : Recording starts when you press START/ STOP, and stops when you
- Страница 57 из 137
Superimposing a title You can select one of eight preset titles. You can also select the position and colour of titles in the menu system. Using titles Наложение надписи Вы можете выбрать одну из восьми предварительно установленных надписей. Вы также можете выбрать яоложение и цвет надписей в
- Страница 58 из 137
Superimposing a title Наложение надписи To select the colour of the title Выбор цвета надписи (1) While in Standby mode, press MENU to display the menu. (2) Turn the control dial to select TITLE COL and press the control dial to select it. The colour menu appears. (3) Turn the control dial to
- Страница 59 из 137
Making your own original titles Создание Ваших собственных надписей 1 MENU 2 Вы можете создать две надписи и занести их в память видеокамеры. Вытолкните кассету перед началом. Ваша надпись может содержать до 22 знаков. (1) Когда видеокамера находится в режиме готовности нажмите MENU для отображения
- Страница 60 из 137
Making your own original titles If you do nothing more than 5 minutes The power goes off automatically. Turn STANDBY down once, turn it again up and proceed from step 3. To delete a title At the leftmost character position, select S and press TITLE. Do not erase the title by selecting empty spaces.
- Страница 61 из 137
Releasing the STEADY SHOT function Отключение функции STEADY SHOT When you shoot, the indicator appears in the viewfinder. This indicates that the Steady Shot function is working and the camcorder compensates for camera-shake. Когда вы производите съемку, индикатор появляется в видоискателе. Это
- Страница 62 из 137
Checking the tape condition before recording (ORC) Проверка состояния ленты перед записью (ORC) Use this feature to check the tape condition before recording, so that you can get the best possible picture. (1) While in Standby mode, press MENU to display the menu. (2) Turn the control dial to
- Страница 63 из 137
English Selecting automatic/manual adjustment modes The camcorder’s automatic functions offer you worry-free operation under most shooting conditions. But in some circumstances, manual adjustment is better for creative recording. You can adjust focus, aperture, shutter speed, gain, and white
- Страница 64 из 137
Русский Выбор режимов автоматической/ручной регулировки Автоматические функции видеокамеры позволяют Вам осуществлять беззаботную эксплуатацию практически во всех условиях съемки. Но при некоторых обстоятельствах ручная регулировка приводит к созданию лучшей записи. Вы можете отрегулировать
- Страница 65 из 137
Focusing manually Ручная фокусировка When to use manual focus Когда использовать ручную фокусировку In the following cases you should obtain better results by adjusting the focus manually. [a] [b] [c] [d] • Недостаточное освещение [a] • Объекты с малым контрастом – стены, небо и т.д. [b] • Слишком
- Страница 66 из 137
Focusing manually Ручная фокусировка Focusing manually Ручная фокусировка When focusing manually, first focus in telephoto before recording, and then reset the shot length. (1) Set FOCUS to MANUAL. The f indicator appears in the viewfinder. (2) Move the power zoom lever to the “T” side until the
- Страница 67 из 137
Для записи очень удаленного объекта Push FOCUS down to INFINITY. The lens focuses on the most distant subject while FOCUS is held down. When it is released, manual focus mode is resumed. Use this function when shooting through a window or a screen, to focus on a more distant subject. Нажать FOCUS
- Страница 68 из 137
Using the PROGRAM AE function Использование функции PROGRAM AE Using the aperture priority mode Использование режима приоритета апертуры Вы можете выбрать апертуру для определения желаемой глубины фокусирующего поля. Скорость затвора автоматически устанавливается (между 1/50 и 1/1750) в
- Страница 69 из 137
Using the shutter priority mode Использование режима приоритета затвора 1 AUTO LOCK 2 PROGRAM AE 3 Вы можете выбирать скорость затвора между 1/50 и 1/10000. Когда Вы выбираете более быструю скорость затвора, движение выглядит четче при меньшем дрожании. Значение апертуры автоматически регулируется
- Страница 70 из 137
Using the PROGRAM AE Function Использование функции PROGRAM AE To return to automatic adjustment mode Для возвращения к режиму автоматической регулировки Set AUTO LOCK/HOLD to AUTO LOCK, or press PROGRAM AE so that no indicator appears in the viewfinder. Установите AUTO LOCK/HOLD на AUTO LOCK или
- Страница 71 из 137
Using the twilight mode Вы можете записать яркий объект в темном месте без искажения атмосферы. Апертура автоматически регулируется для обеспечения надлежащей экспозиции. Скорость затвора фиксируется на 1/50. Данный режим является эффективным, когда Вы записываете ночные пейзажи, неоновые рекламы
- Страница 72 из 137
Using manual mode The manual mode features an advanced recording technique by controlling the exposure with a combination of adjustments of the aperture value, shutter speed and gain level. When to use manual mode [a] Ручной режим характеризуется усовершенствованной технологией записи путем
- Страница 73 из 137
Shooting in manual mode Съемка в ручном режиме 2 IRIS SHUTTER SPEED F8 50 Display window/Окошко дисплея IRIS GAIN F8 SHTR 50 0 dB 1 AUTO LOCK HOLD Display window/Окошко дисплея GAIN 0 dB Advanced Operations / Усовершенствованные операции В ручном режиме Вы можете отрегулировать апертуру, скорость
- Страница 74 из 137
Using manual mode To adjust the shutter speed You can select the shutter speed from the following 20 (CCD-TR3300E), or 16 (CCDTR2300E) speeds: — CCD-TR3300E: 1/3, 1/6, 1/12, 1/25, 1/50, 1/75, 1/100, 1/120, 1/150, 1/215, 1/300, 1/425, 1/600, 1/1000, 1/1250, 1/1750, 1/2500, 1/3500, 1/6000, 1/10000. —
- Страница 75 из 137
Using slow shutter (CCD-TR3300E only) Если Вы хотите сделать темное изображение ярче или оживленно представить движение объекта, установите скорость затвора на 1/25, 1/12, 1/6 или 1/3 (медленный затвор). (1) Установите AUTO LOCK/HOLD в центральное положение. (2) Нажмите SHUTTER SPEED. Индикатор
- Страница 76 из 137
Tips for manual adjustment Советы для ручной регулировки When you shoot in manual adjustment mode, we recommend you to keep the exposure fixed to make a clear picture. This section shows you what the exposure is and how to adjust each item with the exposure fixed. Understanding the exposure Когда
- Страница 77 из 137
Creating a desired picture without changing the exposure Example 1: changing only the shutter speed Когда значение апертуры равно F11, скорость затвора равна 1/50, и уровень усиления равен 0 дБ, отрегулируйте значение апертуры вручную, чтобы оно было равно F5,6, как в впримере. Если Вы изменяете
- Страница 78 из 137
Shooting with backlighting When you shoot a subject with the light source behind the subject or a subject with a light background, use the BACK LIGHT function. Press BACK LIGHT. The c indicator appears in the viewfinder. Съемка с задней подсветкой Когда Вы снимаете объект с источником света позади
- Страница 79 из 137
Регулировка яркости изображения When you shoot in a snowfield or on a beach in the mid-summer and the subject may become dark because of the extreme brightness, you can change the brightness of the picture in the menu system. You can also use this function when the subject is too bright — subjects
- Страница 80 из 137
Adjusting the white balance White balance is the adjustment to make white subjects look white and to obtain a more natural colour balance. Selecting the appropriate mode Select the appropriate white balance mode under the following conditions: [a] [b] Регулировка баланса белого Баланс белого
- Страница 81 из 137
Setting the white balance mode (1) Set AUTO LOCK/HOLD to the centre position. (2) Press WHT BAL so that the white balance indicator appears in the viewfinder. (3) Turn the control dial to select the desired mode. When you select one push white balance mode, press the control dial after selecting
- Страница 82 из 137
Adjusting the white balance Регулировка баланса белого Adjusting white balance manually (One push white balance mode) Регулировка баланса белого вручную (режим баланса белого одним нажатием) You can set the white balance for a particular lighting condition manually. When the white balance is set
- Страница 83 из 137
To return to automatic white balance adjustment mode Press WHT BAL so that the one push white balance indicator disappears in the viewfinder. Note on the one push white balance mode indicator Slowly flashing indicator: white balance has not been set. Quickly flashing indicator: white balance is
- Страница 84 из 137
Searching the boundaries of recorded date You can search for the boundary between recording dates using the Date Code automatically recorded on the tape. There are two modes: •Searching for the beginning of a specific date, and playing back from there (Date Search) •Searching for the beginning of
- Страница 85 из 137
To stop searching or scanning Press one of the following tape transport buttons: ·, π, 0 or ). Для останова поиска или сканирования Нажмите одну из следующих кнопок перемещения ленты: ·, π, 0 или ). To view pictures during searching or scanning Press · and then press 0 or ). Для просмотра
- Страница 86 из 137
Returning to a preregistered position Using the Remote Commander, you can easily go back to the desired point on a tape after playback. Use the tape counter. If the RC time code appears in the viewfinder, set COUNTER to NORMAL in the menu system to display the tape counter. (1) During playback,
- Страница 87 из 137
Locating the marking position Нахождение отмеченной позиции You can locate the beginning of a desired programme easily by marking an index signal during recording or playback and searching for it later. Вы можете легко обнаружить начало желаемой программы путем записи индексного сигнала во время
- Страница 88 из 137
Locating the marking position Notes on marking •Make sure you mark index signals at more than two-minute intervals. Otherwise, you may not be able to search for them correctly. •If you stop recording while the index signal is being marked (the INDEX MARK indicator lights in the viewfinder), the
- Страница 89 из 137
Scanning the beginning of each marking position – index scan 1 SEARCH DATE INDEX Используйте пульт дистанционного управления. Для просмотра изображения на экране телевизора нажмите DISPLAY. (1) Нажмите INDEX на пульте дистанционного управления во время нормального воспроизведения. (2) Нажмите 0 или
- Страница 90 из 137
Locating the marking position Нахождение отмеченной позиции Locating the desired marking position – index search Нахождение желаемой отмеченной позиции – Индексный поиск (1) Press INDEX on the Remote Commander during stop or playback mode. (2) Press INDEX repeatedly until the index number of the
- Страница 91 из 137
Erasing an index signal Стирание индексного сигнала (1) Locate the index signal to be erased using the index scan or index search function. (2) Press INDEX ERASE on the Remote Commander within 2 to 10 seconds while the desired programme plays back. After the index signal is erased, the camcorder
- Страница 92 из 137
Writing the RC Time code on a recorded tape Запись временного кода RC на записанной ленте You can write the RC time code on a recorded tape. Use the Remote Commander. (1) While pressing the small green button on the POWER switch, set it to VTR. (2) Rewind the tape to the beginning and set the
- Страница 93 из 137
To write the RC time code from the end of the RC time code recorded portion Для записи временного кода RC от конца записанной части с временным кодом RC Rewind the tape to the portion on which the RC time code has been written and set the camcorder to playback pause mode. Then follow steps 3 and 4
- Страница 94 из 137
Editing onto another tape You can create your own video programme by editing with any other h 8 mm, H Hi8, j VHS, k S-VHS, VHSC, K S-VHSC or l Betamax VCR that has video/audio inputs. Монтаж на другую ленту Вы можете создать Вашу собственную видеопрограмму путем монтажа с помощью другого КВМ типа
- Страница 95 из 137
Starting editing To edit more scenes Repeat steps 2 to 4. (1) Вставьте чистую ленту (или ленту, которую Вы хотите перезаписать) в КВМ и вставьте Вашу записанную ленту в видеокамеру. (2) Воспроизводите записанную ленту в видеокамере до тех пор, пока Вы не обнаружите точку, откуда Вы хотите начать
- Страница 96 из 137
Recording from a VCR or TV You can record a tape from another VCR or TV programme from a TV that has audio/video outputs. Connect the camcorder to the VCR or TV. (1) While pressing the small green button on the POWER switch, set it to VTR. (2) Press r REC and the button on far right together at the
- Страница 97 из 137
Replacing recording on a tape (insert editing) To change the end point Press ZERO MEM on the Remote Commander so that the ZERO MEM indicator disappears and begin from step 3. Note on the inserted picture The picture may be distorted at the end of the inserted portion when it is played back. Вы
- Страница 98 из 137
Additional Information Дополнительная информация Changing the lithium battery in the camcorder Замена литиевой батарейки в видеокамере Your camcorder is supplied with a lithium battery installed. When the battery becomes weak or dead, the I indicator flashes in the viewfinder for about 5 seconds
- Страница 99 из 137
Changing the lithium battery When replacing the lithium battery, keep the battery pack or other power source attached. Otherwise, you will need to reset the date, time and other items in the menu system retained by the lithium battery. (1) Open the lid of the lithium battery compartment. (2) Push
- Страница 100 из 137
Resetting the date and time Установка даты и времени You can set the date and time in the menu system. (1) Press MENU to display the menu in the viewfinder. (2) Turn the control dial to highlight CLOCK SET, and press the control dial to select it. (3) Turn the control dial to adjust the year, and
- Страница 101 из 137
To check the preset date and time Press DATE to display the date indicator in the viewfinder. Press TIME to display the time indicator. When you press the same button again, the indicator goes off. The year indicator changes as follows: 1996 1997 • • • • 2029 Для проверки предварительно
- Страница 102 из 137
Usable cassettes and playback modes Используемые кассеты и режимы воспроизведения When you play back Когда Вы осуществляете воспроизведение The playback mode (SP/LP or Hi8/standard 8 mm) is selected automatically according to the format in which the tape has been recorded. The quality of the
- Страница 103 из 137
•If a tape has portions recorded in PAL and NTSC video systems, the tape counter reading is not correct. This discrepancy is due to the difference between the counting cycle of the two video systems. •You cannot edit the NTSC-recorded tape onto another VCR. •When you play back on a Multi System TV,
- Страница 104 из 137
Tips for using the battery pack Советы по использованию батарейного блока When to replace the battery pack Когда заменять батарейный блок While you are using your camcorder, the remaining battery indicator in the viewfinder decreases gradually as battery power is used up. When you use the
- Страница 105 из 137
About batteries The “InfoLITHIUM” is a lithium ion battery pack which can exchange data with compatible video equipment about its battery consumption. Sony recommends that you use the “InfoLITHIUM” battery pack with video equipment having the mark. Battery pack care •Remove the battery pack form
- Страница 106 из 137
Tips for using the battery pack Советы по использованию батарейного блока The switch on the battery pack Переключатель на батарейном блоке This switch is provided so that you can mark the charged battery pack. Set the switch to the “green mark” position when charging is completed. (When removed
- Страница 107 из 137
Notes on the terminals If the terminals (metal parts on the back) are not clean, the battery charge duration will be shortened. When the terminals are not clean or when the battery pack has not been used for a long time, repeatedly install and remove the battery pack a few times. This improves the
- Страница 108 из 137
Maintenance information and precautions Информация по уходу за аппаратом и предосторожности Moisture condensation Конденсация влаги If the camcorder is brought directly from a cold place to a warm place, moisture may condense inside the camcorder, on the surface of the tape, or on the lens. In this
- Страница 109 из 137
Video head cleaning To ensure normal recording and clear pictures, clean the video heads. When the v indicator and “ CLEANING CASSETTE” message appear one after another in the viewfinder or playback pictures are “noisy” or hardly visible, the video heads may be dirty. Для обеспечения нормальной
- Страница 110 из 137
Maintenance information and precautions Информация по уходу за аппаратом и предосторожности Precautions Предосторожности Camcorder operation Эксплуатация видеокамеры •Operate the camcorder on 7.2 V (battery pack) or 8.4 V (AC power adaptor). •For DC or AC operation, use the accessories recommended
- Страница 111 из 137
AC power adaptor Зарядка Charging •Use only a lithium ion type battery pack. •Place the battery pack on a flat surface without vibration during charging. •The battery pack will get hot during charging. This is normal. • Используйте только литиево-ионный тип батарейного блока. • Разместите
- Страница 112 из 137
Using your camcorder abroad Each country has its own electric and TV colour systems. Before using your camcorder abroad, check the following points. Power sources You can use your camcorder in any country with the supplied AC power adaptor within 110 V to 240 V AC, 50/60 Hz. Difference in colour
- Страница 113 из 137
English Trouble check If you run into any problem using the camcorder, use the following table to troubleshoot the problem. Should the difficulty persist, disconnect the power source and contact your Sony dealer or local authorized Sony service facility. Camcorder Power Cause and/or Corrective
- Страница 114 из 137
Trouble check Operation Symptom Cause and/or Corrective Action Recording stops in a few seconds. •The START/STOP MODE switch is set to 5 SEC or m Set it to . (p.56) The cassette cannot be removed from the holder. •The battery is dead. m Use a charged battery pack or the AC power adaptor. (p.8, 32)
- Страница 115 из 137
Picture Cause and/or Corrective Action The image on the viewfinder screen is not clear. •The viewfinder lens is not adjusted. m Adjust the viewfinder lens. (p.14) A vertical band appears when a subject such as lights or a candle flame is shot against a dark background. •The contrast between the
- Страница 116 из 137
Trouble check Symptom Cause and/or Corrective Action The CHARGE lamp flashes after you charge the battery pack installed in the camcorder. (CCDTR3300E only) •The camcorder is not malfunctioning. AC power adaptor Symptom Corrective Actions The VTR/CAMERA or CHARGE lamp does not light. • Disconnect
- Страница 117 из 137
Русский Проверка неисправностей Если у Вас возникла какая-либо проблема при использовании видеокамеры, воспользуйтесь следующей таблицей для отыскания и устранения проблемы. Если трудности все еще остаются, то отсоедините источник питания и свяжитесь с Вашим дилеру Sony или местным уполномоченным
- Страница 118 из 137
Проверка неисправностей Работа 118 Признак Причина и/или действия по исправлению Запись останавливается через несколько секунд. • Переключатель START/STOP MODE установлен в . положение 5 SEC или m Установите его в положение . (стр. 56) Кассета не может быть вынута из держателя. • Батарейный блок
- Страница 119 из 137
Изображение Признак Причина и/или действия по исправлению Изображение на экране видоискателя нечеткое. • Объектив видоискателя не отрегулирован m Отрегулируйте объектив видоискателя. (стр. 14) Вертикальная полоса появляется, • Слишком высокий контраст между объектом и фоном. Камера не является
- Страница 120 из 137
Проверка неисправностей Признак Причина и/или действия по исправлению Лампочка CHARGE мигает после зарядки батарейного блока, уст ºнного в видеокамере. (только CCDTR3300E) • Видеокамера не является неисправной. Сетевой адаптер перем. тока Признак Действия по исправлению Лампочка VTR/CAMERA или
- Страница 121 из 137
English Specifications Video camera recorder System * Minimum illumination expresses the light level a camcorder requires to produce a pictures to produce a picture. Visible minimum low light expresses the light level to produce a visible signal. General Power requirements 7.2 V (battery pack) 8.4
- Страница 122 из 137
Русский Технические характеристики Видеокамера Система Система видеозаписи Две вращающиеся головки, система ЧМ наклонной механической развертки Система аудиозаписи Вращающиеся головки, система ЧМ Видеосигнал Цветовой сигнал PAL, стандарт CCIR Используемые кассеты Кассеты 8-мм видеоформата (Hi 8 или
- Страница 123 из 137
Identifying the parts Опознавание частей 9 !º !¡ !™ !£ !¢ !∞ !§ !¶ 1 POWER switch (p.13) 1 Выключатель POWER (стр. 13) 2 STEADY SHOT switch (p.61) 2 Выключатель STEADY SHOT (стр. 61) 3 MENU button (p.35) 3 Кнопка MENU (стр. 35) 4 Control dial (p.35) 4 Регулировочный диск (стр. 35) 5 PICTURE EFFECT
- Страница 124 из 137
Identifying the parts Опознавание частей !• !ª @£ @º @¢ @∞ @¡ @™ !• EJECT switch (p.12) !• Выключатель EJECT (стр. 12) !ª LANC l control jack l stands for Local Application Control Bus System. The l control jack is used for controlling the tape transport of video equipment and peripherals connected
- Страница 125 из 137
#¢ @¶ @• @ª #∞ #º #§ #¡ #¶ #• #£ @¶ Tape transport buttons (p.26, 27, 28, 96, 97) π STOP (stop) 0 REW (rewind) · PLAY (playback) ) FF (fastforward) P PAUSE (pause) r REC (recording) @• EDITSEARCH button (p.20) @ª Accessory shoe Supplies power to optional accessories such as a video light. #º Focus
- Страница 126 из 137
Identifying the parts Опознавание частей $º $∞ $§ $¶ $• $ª %º %¡ %™ %£ $¡ $™ $£ $¢ $º Lighting aperture $º Световая апертура $¡ COUNTER RESET button (p.15, 52, 86) $¡ Кнопка COUNTER RESET (стр. 15, 52, 86) $™ DATE button (p.29, 39) $™ Кнопка DATE (стр. 29, 39) $£ Lithium battery compartment (p.99)
- Страница 127 из 137
To Watch the demonstration Для просмотра демонстрации You can watch a brief demonstration of pictures with special effects. If the demonstration appears when you turn on the camcorder for the first time, exit the demo mode to use your camcorder. For details on the location of the buttons, refer to
- Страница 128 из 137
Identifying the parts Опознавание частей Handycam Station (supplied for CCD-TR3300E only) Станция Handycam (прилагается только к CCD-TR3300E) 7 8 9 0 !¡ !™ !£ !¢ !∞ !§ 1 2 3 4 5 6 1 Camcorder mounting surface (p. 24) 2 RELEASE button (p. 25) 3 LANC l control jack 4 HANDYCAM POWER lamp 5 HANDYCAM
- Страница 129 из 137
Remote Commander The buttons that have the same name on the Remote Commander as on the camcorder function identically. Кнопки пульта дистанционного управления, которые имеют одинаковые наименования с кнопками на видеокамере, функционируют идентично. 6 7 8 9 !º !¡ !™ !£ 1 COUNTER RESET button (p.15,
- Страница 130 из 137
Identifying the parts Опознавание частей To prepare the Remote Commander To use the Remote Commander, you must insert two R6 (size AA) batteries. Use the supplied R6 (size AA) batteries. (1) Remove the battery cover from the Remote Commander. (2) Insert both of the R6 (size AA) batteries with
- Страница 131 из 137
Remote control direction Направление пульта дистанционного управления 15° 5m 25° 30° 15° Attaching the shoulder strap Attach the supplied shoulder strap to the hooks for the shoulder strap . 1 2 Примечания к пульту дистанционного управления • Держите дистанционный датчик подальше от сильных
- Страница 132 из 137
Identifying the parts Operations indicators 1 2 3 4 5 6 7 8 9 0 !¡ !™ !£ cW 100 F3.4 3 dB LUMI. MOSAIC CINEMA T SP STBY 0:00:00:00 ZERO MEM DATE SEARCH 4 40min 7 1996 1 AE Shift indicator (p.79) 2 WIND indicator (p.36) !¢ !∞ !§ !¶ !• !ª @º @¡ @™ @£ @¢ !∞ @∞ !§ @™ ORC SP LP 4 7 1996 == STBY == AE A
- Страница 133 из 137
Опознавание частей Рабочие индикаторы cW 100 F3.4 3 dB LUMI. MOSAIC CINEMA T SP STBY 0:00:00:00 ZERO MEM DATE SEARCH 4 40min 7 1996 1 Индикатор смещения АЕ (стр. 79) 2 Индикатор WIND (стр. 36) 3 Ручная фокусировка (стр. 66, 67) 4 Индикатор задней подсветки (стр. 78) 5 Индикатор баланса белого (стр.
- Страница 134 из 137
Предупреждающие индикаторы Warning indicators If indicators flash in the viewfinder or in the display window, check the following: ≥: you can hear the beep sound when the BEEP is set to ON. 1 2 Если индикаторы мигают в видоискателе, проверьте следующее: ≥: Вы можете слышать зуммерный звуковой
- Страница 135 из 137
Index A, B F, G, H S Adjusting viewfinder ............... 14 AE shift ....................................... 79 AFM HiFi Sound ..................... 102 Aperture ..................................... 73 Aperture priority mode ............ 68 Auto focus .................................. 66
- Страница 136 из 137
Алфавинтый указатель А, Б, В Н, О Ф–Я Автоматическая фокусировка ....................... 66 Автомобильный аккумулятор ........................ 34 Апертура ................................ 73 Введение/выведение изображения ............... 40 – 41 Воспроизведение на телевизоре
- Страница 137 из 137